
In this tutorial we look at Units. It is important that before you commence this tutorial that you have read through the other Scenario Editor Tutorials to date.
Load up the new version of the editor, and then load up our Luxembourg scenario - refer to Editor Tutorial 2 if you need reminding how to do this.
You may also recall that in Tutorial 2, during our 'clean up' we had a brief look at the Units data base when we cleared units from the map. We will now return to Units and have a more detailed look.
From the Main Menu, select Edit Units, this should take you to the familiar lay out of the Units Menu. Listed in the right hand side of the bottom panel are all of the countries involved in this scenario/battle. Because we have based this scenario on the TAO battleset, it has carried over all of the country data from the TAO game. You should see United States [Allies], Great Britian [Allies] and Germany [Axis listed].
For the purposes of this tutorial, we will add some Allied, United States units to the scenario. What you learn here can be used to add German units of your own accord later on. Click on United States [Allies], to access the United States Unit Database.
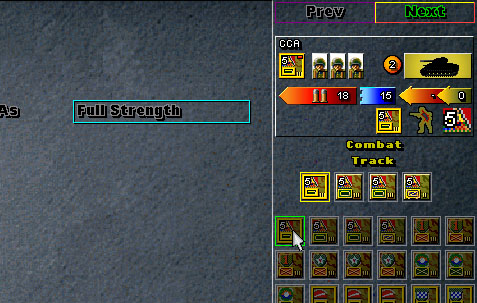
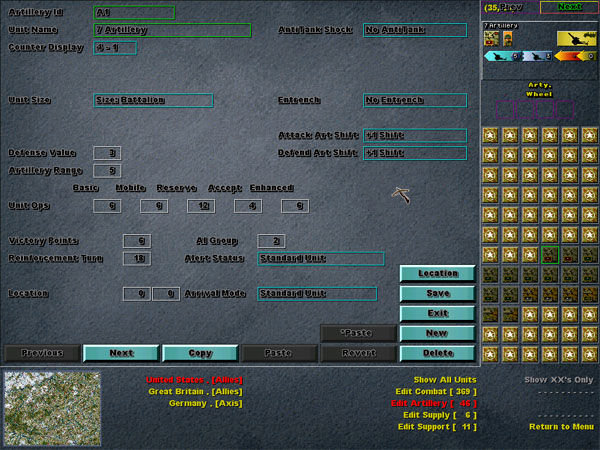
You should now be presented with the following screen.
On the right hand side are a list of all of the units that are available in the scenario. You can select any of these and add them to the scenario, or you may even create new ones. We will cover both methods as we proceed through this tutorial. Any units darkened (as shown above) mean that the units are available, but have not been applied to the scenario yet. Any units that are highlighted means that that unit is an active unit in this scenario.
The main part of the screen reflects the 'general' settings for the currently selected unit. This is where you set the specific details of each unit, by defining the type of unit it is, the counter display it should use, the units name, its movement points (OPs), attack and defense strength etc. Everything to do with the unit is set in this main part of the screen. It is important to note that there are several diffent 'pages' to this screen - we will look at how you 'change pages' in a minute.
In the bottom panel of the screen, list on the left are the countries, which allows you to select each countries unit data base, so if you wanted to set a unit for Germany you would select Germany here, similarly for United States and Great Britian. On the right hand side of the bottom panel listed the following:
These toggles allow you to not only restrict or filter the type of unit that is shown in the upper right hand unit icon panel, but it also allows you access to specific information relating to that type of unit in the main frame - remember how I mentioned that there are different 'pages' of unit data that is shown in the main screen? Well when you select Edit Combat units from this panel, it will bring up the Combat unit page in the main screen. This will allow you to set the variables that only relate to the combat abilities of the selected unit. Similarily, the same applies to Support, Supply and Artillery units. Sounds confusing, but its not! You will see how it works now as we start to add units to the scenario.
As I mentioned before, in this scenario we will add some United States units to the game. Infact we will add atleast one unit from each category, Infantry, Tank, Support, Supply and Artillery. This way we will ensure that we have covered every single possible setting in the Unit database!
First off, lets select an existing ARM unit and add it to the game. Select the first United States Allied unit, it should be an element of the 5th ARM - CCA from the right hand panel.
This should bring up the 'general' unit data in the mainframe.
This unit information is general and it applies to each unit, regardless of the type of unit it is. Lets have a look at each of the settings:
Unit Id: This is just an id which you can give to the unit. It is not shown in the game. You may want to give each of your units a unique number to identify it in the database, as far as I know this setting is optional.
Unit Name: This is the name that will appear in the game for the unit. You may want to use the units actual title like 'CCA', or '2a' or call the unit '1 Rifle Bat.' Whatever you type here will be shown in the game as the name for that unit when it is selected. This name does not have to be specific, and it can be repeated. So you can have several units called 'Rifle Infantry' if you want to.
Counter Display: Clicking on the field next to this title will bring up all available Counter Displays for this country:
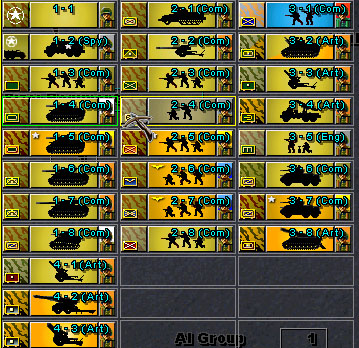
Depending upon which counter you select will determine what type many of the attributes for the unit. For example, if you select a Supply Truck counter, then this unit will operate as a supply truck. If you select Infantry then the unit will operate as infantry, if you set Engineers then the unit will operate as Engineers etc. In addition to this basic unit type information, the counter display also stored information relating to whether the unit is normal, Elite or substandard. Elite unit counters are those which a yellow background to the single step icons (the pictures of the soldiers heads in the above graphics (1-5 (com) and 3-7 (com) for example). Substandard units have a Red backgrond (3-1 (com) for example). All others are considered normal units. The Counter display also determines what mode the unit travels in, be it leg, motor, horse, or track.
When you select a unit counter, it is updated in the unit icon display for that unit in the top right hand corner of the screen.
Unit Counters can be modded and edited.. but that it outside the scope of this tutorial. I may do a future tutorial on the topic at a later stage, although if you are really keen you can read this thread: http://robjess.com/bbs/viewtopic.php?p=907#907
For the time being, for this scenario - lets keep the unit of the 5th ARM using counter 1-4 (Com).
Unit Size: This setting is used to place a size indicator on the unit icon graphic. You may select from none, Company, Battalion, Regiment, Brigade, Divison, Corps or Army. For this unit leave it set to Regiment which should put a III on the unit counter. This can be seen on the unit display in the top right hand corner.
Initial Strength: From here you can make the unit start the game with some losses already imposed. The valid settings are; Full Strength, 1 KIA, 2KIAs or 3KIAs. Leave this setting as Full Strength for this unit.
OB Group: Allows you to set the Order Of Battle that this unit belongs to. For example, you may choose to have all units from X Army set to OB Group 1, and then all units from Y Army set to 2 and all units from Z Army set to 3. All units with the same OB Group number will appear on the same page in the OOB screen within the game.
Victory Points: Allows you to set the amount of victory points that will be awarded for the destruction of this unit.
AI Group: Allows you to set this unit to a specific AI group. All units need to have an AI group setting, because when we come to programing the AI, you will see that we dont give a set of instructions to each unit, we actually program instructions to an AI grouping. So all units in the same AI Group will follow the same orders. The AI Grouping number doesnt have to be the same as the OB Group number - infact there may be a very good reason why it shouldnt be. For example, all units that you want to attack as the same group should be given the same AI Group number. So whilst units from the same Division should be given the same AI group number (so that they operate as a division and obtain divisional intregrity bonus'), there may be some units from the same OB Group that you want to defend and not attack! Similarly, you may want units from different OB Groups to be in the same AI group and attack together.
A good way of thinking of AI groups is dividing the units up into attack forces, like Army Group North, Centre and South. You would want all units in the north of the battlefield to be in the same or common AI groups because they would all attack together. Also, if you have a heap of units coming onto the battlefield as reinforcements on Turn x - you may want all of these units to operate together as an AI group on the battlefield, even though the reinforcements may be from a mixed OB groups. Also note that you can give the several AI groups the same orders. So if you want all units to attack Town X, this doesnt mean that they have to all be in the same AI Group - but they will need to be in common AI groups.
Don't stress about AI groups too much now.. I can gaurantee that as you play, test and balance your scenarios you will be coming back often to mix and match your AI groups to try and get the best results!
For the purposes of this scenario though, set this units AI group to 1.
Reiforcement Turn: This settings allows you to specifiy what turn the unit will arrive on the battlefield. If you want the unit to start the game on the battlefield (ie: NOT arrive as a reinforcement) then leave this setting as 0.
Alert Status: This allows you to specify whether the unit is a standard unit (normal) of if it is an Alert Status unit. I dont know what the setting of Unit Deactivated means. If you want the unit to enter the game based upon alert points, then select Alert Status. For the purposes of this scenario leave it set as Standard Unit.
Location: This is the location that the unit either starts the game on, or arrives on if it is a reinforcement or alert unit. Clicking on the Location Button
![]() Will allow you access
to the map, where you can simply click on the hex that the want the unit to
be located in, this will then update the location field with that hexes coordinates.
Do this now and place the unit in the town of Capellen which should be hex 41,45.
Will allow you access
to the map, where you can simply click on the hex that the want the unit to
be located in, this will then update the location field with that hexes coordinates.
Do this now and place the unit in the town of Capellen which should be hex 41,45.
| Tip: If you want to remove a unit from the scenario, all you need to do is clear out the units location information - reset it to 0,0 and the unit will not appear in the game! Selecting the Delete menu item from else where will delete the unit from the data base - you dont need to do this.. just set its location to 0,0 - the unit will no longer be part of the scenario but it will still be in the database incase you later choose to make it active again! |
Arrival Mode: Allows you to specify the mode in which this unit will arrive. Valid settings are; Standard Unit, Not Used, Comm1, Comm2, Naval Transport, Air Drop and SP Release.
Comm1 and Comm2 relate to the use of the Motor Pool if it is available. For example, to have infantry units arrive in Lorry's from the motor pool select one of these settings. Naval Transport I assume is exactly that, though I have never used it and I am unsure if its funcational. Air Drop relates to Paratroopers - we will look at this in more detail at a later stage, and SP Release means that the unit has dispersed Strongpoints assigned to it. If the unit has been set as SP Release, then you should ensure that the Release Unit Indicator setting under the Strongpoints Function is set to the location of the this unit for each of the strongpoints relating to this 'mother unit'. For more information see Tutorial 7 on Strongpoints.
For the purposes of this unit in this scenario, select Standard Unit.
That covers all of the General Settings that are common and apply to all units. Given that we have an element of the 5th ARM selected - we now need to define the settings that a specific to this units Combat capabilities and Role!
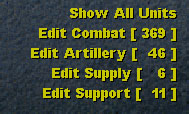
With the same unit select, now focus on the Unit Type Menu at the bottom of the screen:
As briefly mentioned earlier, this menu not only allows you to retrict the types of units listed in the right hand panel, but it also allows you access to settings that are specific to that type of units role. Before we select one of these though, notice that nice to each unit type, it lists how many of those units are currently in the data base. There are currently 369 Combat units in the United States database for this scenario! Of course not all of those are active in the scenario though - but they are all there waiting to be used if needed.
Click now on Edit Combat so as to only show combat units in the right hand panel - and to give us access to the specific Combat Unit settings. Ensuring that we still have the first of the 5th ARM units, the CCA unit selected, your screen should now look similar to this:
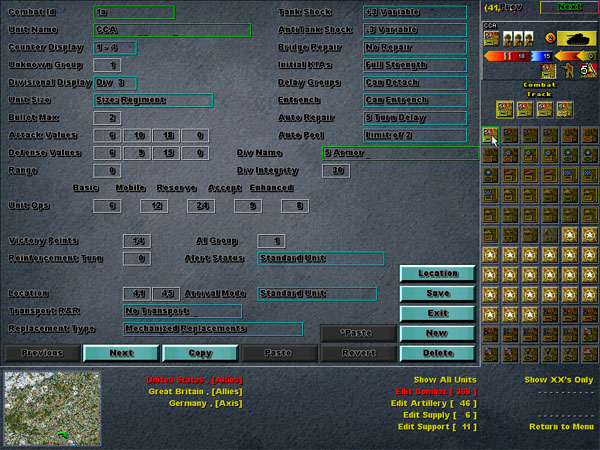
Units in the right hand panel should now only be showing those which are combat units (ARM and INF for example), and the main frame in the centre of the screen show now be showing the combat specific settings for this unit. Lets run through them:
Combat Id, Unit Name and Counter Display : are the same as those described above under the General Unit Settings.
Unknown Group : I am unsure of this function and have never used it.
Divisional Display : Clicking in this field allows you to select the Divisional Insignia for this particular unit. All units from the same division should have the same Divisional Insignia. The Divisional Integrity Bonus is based upon all units having the same setting from this Divisional Display setting.
Unit Size : Is the same as that described above.
Bullet Max : Allows you specify the number of bullets this unit has. Note that you must use the left and right arrow keys to increase and decrease this value.
Attack Values: Allows you to specify the attack values for each step that the unit has. For example, if you want the unit to have 2 steps maximum, then you should only enter two attack values.
Defense Values: Allows you to specify the defense values for each step that the unit has.
Range : Allows you to specify the range of the unit - I think this only applies for Artillery units and am therefore a bit unsure as to why it shows up under the Combat unit settings. I have tried to get an ARM unit with a range of more then 0 to attack, but it doesnt work. This should therefore be set to 0 as a default for all units except Artillery units.
Unit Ops : Allows you to set the units movement points (OPs) for each mode of movement, from Basic, Mobile, Reseve, Accept and Enhanced. Lets have a look at what each of these settings really mean. Basic, is exactly that! The raw basic movement allowance, this is what the unit will always be able to move even if it runs out of supplies. For infantry units its what represents Leg movement. For ARM, it also should probably represent basic Leg movement. Mobile, is the movement allowance that is allowed for this unit is it is track or wheel capable, if the unit is not track or wheel capable then this setting should be 0. Reserve is the amount of OPs that the unit is able to carry in reserve which it can draw upon without being able to 'accept' fresh OPs from a supply truck/dump. Generally the Reserves setting is twice what the Mobile setting is. Accept, is how many OPs the unit is reimbursed each turn from a supply truck. For INF units this may be slightly less then the units basic movement allowance, so that it can not continually move at extended movement, to reflect that it will get exhausted after several turns. For Tracked and Wheeled units, this setting should be also be slightly less then its Mobile setting, to reflect that it too needs to stop at some point to be able to replenish its reserves. The final setting is Enhanced movement, this is the OP setting for units using extended movement.
Lets look at some examples so we can really see how it works.
First off lets take an INF unit that has the following settings:
Basic |
Mobile |
Reserve |
Accept |
Enhanced |
8 |
4 |
8 |
3 |
2 |
This means that the INF unit can move using 12 OPs each turn. Thats 8 from Basic and 4 from Mobile. If the unit uses Enhanced/Extended movement it can actually move 14 OPs (thats Basic + Mobile + Enhanced [8+4+2]). Basic movement is what the unit will always be able to move, so it will always be able to expend 8 OPs in movement. If the unit ever move out of the range of a supply truck, it will be able to draw upon its 8 Ops in reserve until they are all used. If they are every all used up and the unit is still not in a supplied hex, then the unit will only be able to move its 8 Basic Ops. If the unit moves back into supply, it will accept 3 Ops each turn to replenish its Reserve. The Reserve OPs are used up when Enhanced and Mobile Ops are used when the unit is out of supply range.
Got that?! I hope/think thats correct! The important thing to remember is that the Basic, Mobile and Enhanced Ops are cumulative. So enhanced movement is not 2 its actually equal to 8+4+2 = 14! Because when the unit moves in enhanced mode, it is using its Basic and Mobile Ops also.
Lets have a look at an ARM unit:
Basic |
Mobile |
Reserve |
Accept |
Enhanced |
4 |
12 |
24 |
9 |
8 |
These are the movement OPs for a tracked unit. This reflects that the unit has a basic movement of 4 (not very far!) but with its mobile movement of 12 that gives it a fairly good 'normal' turn movement OP of 16 - slightly better then the Infantry unit we look at above. This unit is able to carry 2 turns worth of its mobile allowance in reserves and it will accept 9 Ops each turn to replenish its reserve once it starts to get depleted. What really gives this unit its movement capabilities is its enhanced movement though, using this mode it is able to use 4+12+8=24 Ops per turn in movement which is almost double that of the Infantry unit. But looking at its Basic movement of 4 - this unit will really be in trouble if its gets cut off and runs out of reserves without being able to accept any Ops from a supply source.
Finally, lets have a quick look at a wheeled Recon unit:
Basic |
Mobile |
Reserve |
Accept |
Enhanced |
6 |
18 |
36 |
15 |
0 |
This unit has no enhanced, as its main role is to be out there zooming around anyway.. it is highly mobile, with 6+18 standard movement OPs per turn and has a reserve of 36 and an accept of 15 per turn. You can tell this unit is designed to burn rubber!
For our unit in this scenario use the following settings; Basic - 6, Mobile - 12, Reserve - 24, Accept - 9, Enhanced - 8.
Victory Points, AI Group, Reinforcement Turn, Alert Status, Location and Arrival Mode, have all been covered previously under the General Unit settings.
Transport R&R : I am unsure about, but I think its used in conjuction with Arrival Mode in defining which Comm mode the unit is able to gain transport from.
Replacement Type : Allows you to specify the type of replacements this unit can take, valid settings are No Replacements, Infantry or Mechanized.
Tank Shock : Allow you to specify settings the shock settings for combat units. Valid settings are Tank +1, Tank +2, Tank +3, Variable +1, Variable +2, Variable +3. Selecting a "Tank +" setting will mean that this unit will always have that + setting Shock capability regardless of the strength and health of the unit. Setting a Variable + setting means that the unit will start off with that + Shock setting but as the unit loses steps, its + setting will gradually decrease. For example, setting +3 Tank for a unit with 3 steps means that the unit will always have +3 shock regardless of how many steps it has left, setting a variable +3 setting means that the units + shock capability will be equal to the number of steps the unit has at that point in time. Tank shock should always be provided to Tank units.
Anti Shock : As above, but in relation to Anti Shock. Anti shock should always be provided to Tank units and also to Anti tank capable units.
Bridge Repair : Allows you to specify whether this unit can repair a bridge. This setting is available to Combat units, as some Engineers were combat capable also.
Initial KIAs : As covered previously under General Unit Settings.
Delay Groups : Allows you to specify if this unit is capable of dropping delaying detachments.
Entrench : Allows you to specify whether this unit can entrench.
Auto Repair : This setting allows you to determine how many (if any at all) turns it takes for 'timed losses' to be repaired. Valid settings range from Permanent to 9 Turn delay. A setting of 5 would mean that if this unit received a timed step loss, it would take 5 turns for the loss to recover automatically.
Auto Pool : Defines how many times a unit can receive a timed step loss before all future loses are permanent. Valid settings are : Inexhaustable to Limit of 9. A setting of 2 means that this unit can receive 2 timed step losses and then all losses thereafter are permanent and must be recovered by the use of replacements.
Div Name : Allows you to specify the Name of the Division that this unit (and all other units using the same Divisional Insignia settings) belongs to. What you type here will appear in the Unit pop up box.
Div Integrity : This setting is a percentage of the units attack and defense strengths that will be added to the units final strengths should it be within divisional intregrity range of all other units belonging to the division. For example, if you enter 60 here, then 60% of the units strength will be added to itself as its Divisional Integrity bonus.
Phew! Thats alot.. but thats it for Combat units! That was by far the biggest of the settings, the following Support, Supply and Artillery settings feature many of the settings already covered, so we will only look at the new settings specific to each of them. Lets move onto Artillery.
Now click on Edit Artillery so as to only show Artillery units in the right hand panel - and to give us access to the specific Artillery Unit settings. All units except for Artillery units should be disabled, ensuring that we now select an Artillery unit from the right hand panel, the main screen should update to reflect the newly selected units Artillery settings:
Many of these settings have previously been covered either under the General Unit Settings, or the Combat Unit Settings, so I will only look at the Artillery specific ones here. Remember that its the units counter display that determines the type of unit that it is - therefore only units with Artillery Counter Displays will be able to have these settings apply to them.
Firstly note that Artillery units do not have any attack strength values - they only have single one step entry for their defense value.
Artillery Range : Allows you to specify the range of the Artillery unit in hexes.
Attack Art Shift : Allows you to specify how many positive shifts this Artillery unit can provide in support of an attack. Valid settings are none, +1 Shift. +2 Shift or +3 Shift.
Defense Art Shift : Allows you to specify how many shifts this Artillery unit can provide in support of a defense. Valid settings are none, +1 Shift. +2 Shift or +3 Shift.
Thats all thats new in relation to Artillery! Lets move onto Supply.
Now click on Edit Supply to restrict the unit types to supply Trucks. You are again reminded that its the units counter display that determines the type of unit that it is - therefore only units with Supply Counter Displays will be able to have these settings apply to them.
The only thing that hasnt been covered already that relates to Supply units, is the Supply Burst Setting -
Supply Burst : Supply Burst specifies the number of Supply Ops which this supply truck has. This in turn determines the range of the supply truck, based upon the type of terrain, location of enemy units and interdiction.
Pretty simple really! Although very important! Infact you should get into the habit of making a Supply truck the first unit that you put on the battlefield for each side/country. Your armies will not be able to function without them, and I have spent many hair pulling moments wondering why all of my units were in the red!
Lets move onto Support Units..
There is nothing in the Support Units screen that we have not covered elsewhere in this tutorial either under General Units or Combat Units. Mostly Support units are single step Engineer units that have the ability to repair bridges, provide anti-shock and detach.
| Note: The Korsun Pocket 1.1 Patch will introduce different rules in relation to the use and mangement of support units. Im summary, the patch will introduce more units into the 'support' category - so whilst at the moment Engineers are really the only type of units that are support units, the patch will see AA and some AT units as support units also. |
Creating new units are no different to selecting and editing an existing unit. Except you select New from the menu and you must ensure that you select a Counter Display which is appropriate to the unit type (ie: pick an ART counter for Artillery units). It is always wise to ensure that you click on Show All Units before you create any new units. Also note that if the units in the right hand panel do not refresh after clicking on Show All Units, simply select another country and then reselect the original country again - this should ensure that the right hand panel refreshes.
Your Home Work:
If you have been creating the Luxembourg scenario as you follow these tutorials, go ahead and add some Allied and Axis units - of your choice - to the scenario. Dont forget to add some supply trucks - and dont over do it - you dont want too many units. Once you have added some units - you may even be able to start to play the game against yourself hotseat!
Tip: If you are keen to test the scenario out against yourself, you may have noticed that the Allied units are subject to a 3 turn surprise embargo. You can remove this by going to (from the main menu in the editor): Edit Country Data, Edit Allies, then change all of the settings in the Activation Dist. fields to 0. Make sure you click on Save and then you should find that the allies are no longer subject to the elements of surprise! |
The next tutorial we will look at the Virtual AI - so you should ensure you add atleast 12 units amongst two different AI Groups for each side.