Fire up the Korsun Pocket Scenario Editor, click on The Ardennes Offensive Battle set and then click on Edit Scenario. Select the Luxembourg scenario in the right hand panel and then click on Load. This should load our scenario into the computers memory, reading it to be edited!
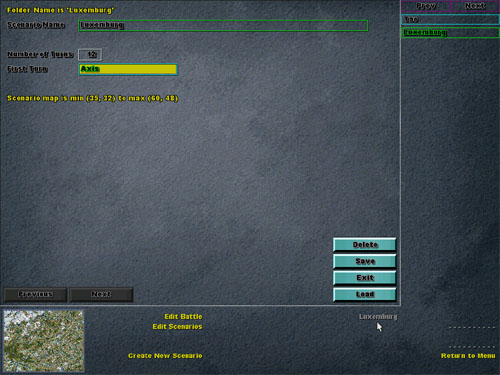
You can confirm that the correct scenario is loaded because it should state the name of the scenario, 'Luxembourg' in gray text in the bottom panel - as shown above. Now click on Return to Menu to take us back to the Main Menu.
It is from the Main Menu that you are provided with the options to change any of the variables of the scenario.

Whilst we will not look at all of these options now, we will cover most of them in future tutorials. For the time being, here is a brief run down on what each of them do:
Edit the Map : |
Put simply, it is from here that you can make and edit
maps. For the purposes of our scenario, we are going to use the same map
that the Ardennes Offensive is based upon, so we wont have a need to explore
this option just yet. |
Edit Units : |
It is here that you can edit all of the units that are used in the scenario, ranging from when they arrive as reinforcements, their strengths, and even how many victory points are awarded for each units destruction. We will look at this in more detail a bit later on in this tutorial and in detail in a future tutorial. |
Edit Objectives : |
This allows you to create and edit objectives and victory locations
for the scenario, including the points awarded for capturing and hold
the objective for each turn, defining what turns each objective is active
for, and setting the alert points - if any - for each objective. We will
look at this in more detail in a future tutorial. |
Edit Supply Sources : |
Without supplies your troops can not fight. This option allows you
to specific supply sources within the scenario, including off map supply
sources, supply sources in towns (like Bastogne), air lifted supply sources
(like Korsun Airfield) and air dropped supplies in support of paratroopers.
We will look at Supply Sources in more detail in a future tutorial. |
Edit Reinforcements : |
Allows you to define entry points for reinforcements and the rules
associated with them if/when an entry hex is controlled by the enemy.
For example, do the reinforcements redirect to another hex with a several
turn delay, or do they just not show up? We will look at this in detail
in a future tutorial. |
Edit Strongpoints : |
It is here that you can create and edit all of the strongpoints in the scenario. We will look at this in a future tutorial. |
Edit Terrain : |
Allows you to define the movement rates (OP costs) for units in both good and bad weather conditions for each of the terrain types - including river and roads. |
Generate/Edit Bridges : |
Allows you to define the status of all bridges in the scenario. For example you can mark a bridge as always blown, or un repairable. |
Edit CRTs : |
This option allows you to set and define each of the Combat Results Tables for each of the terrain types within the scenario. If you think its too hard to dislodge a unit from urban terrain - then its in here that you can change it. Major changes here could have a significant impact on game play! |
Edit Country Data : |
Allows you to edit weather information - including the parentage chances of good and bad weather conditions in random weather games, interdiction, supply burst and replacements for each country. In addition to this you can also set other common game variables, including stack limitations and victory points required for marginal and decisive victories. |
Edit Scenario : |
We covered this in tutorial 1. This is where you create, edit and load scenarios. |
Virtual AI : |
This is what its all about! This is where you define and program the AI for each of the army groups that you have defined in the scenario. We will look at this in alot of detail in a future tutorial. |
Edit AI Regions : |
Allows you to define specific regions on that map, that will be used by the Virtual AI. |
Edit Strings : |
Allows you to define the names of each of the army groups, and turn data. |
I know you are probably itching to get in and have a look at what some of these things do.. but before we start adding things, we need to clear our scenario out first. Remember how in Tutorial 1 we saw how the map data in our new scenario was carried over from the Ardennes battle set? Well guess what! A whole lot more data has also been carried over. Because the scenario we are going to create is fictitious, we don't necessarily need any of the historical data from the Ardennes battle set - like unit starting locations.
To see what I mean, click on the Edit the Map option to to to the Map menu. Now click on Show Units. This will toggle the units and super impose them onto the map.

The units that you now see on the map are those in their starting positions for the Ardennes Offensive Battle. We don't need these so we will clear them out. To do this we need to go to Edit Units, so first of all click on Goto Main Menu, and then when back at the main menu click on Edit Units, and then click on United States - [Allies] to bring up the US forces.
The Edit Units screen is split into three sections - the bottom frame holds the Edit Units Menu, the right frame displays the unit icons of each of the units (over several pages) and the main frame shows the details relating to the unit currently selected in the right frame. I wont go into a detailed explanation of all of these features yet - we will cover that shortly. For the time being lets just quickly clear any active units from the scenario so we can get onto the fun stuff.
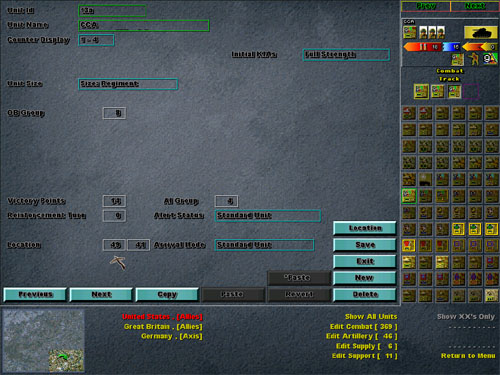
At the top of the right hand Unit Icon panel you should see Prev and Next buttons used to scroll between pages. Click on the Next button to advance to the next page. You should now notice that some of the unit icons are highlighted - like in the screen shot above.
Highlighted units indicate that they are active within the scenario. These are the units that we previously saw super imposed on the map. We want to remove them from our scenario. The easiest way to do this is to change the Location coordinates of each unit to 0,0 - this is because there is no hex coordinate of 0,0 and it will therefore be removed from the scenario. Do not click on Delete - as this will remove the unit from the database and we will not be able to call upon it for inclusion later on.
Select the first highlighted unit, the element of the 9th ARM, and then change the location to 0, 0 - as shown below.
![]()
I usually find it easiest to type in the first coordinate and then press enter so that it tabs across to the next one and then press enter again to confirm the last one. Now select another unit and you should see that the 9th ARM is no longer highlighted - confirming that it is no longer active in the scenario. Now go ahead and select each of the highlighted (active) units individually and change their coordinates to 0,0 also. Don't worry if some units do not turn gray straight away.. they eventually will.
We only really want to change the location values of active units at the moment - if you accidentally change something else - you can click on the Revert button at the bottom on the main frame to reinstate the previous data for the unit - you must do this before you save or select another unit though.
When you have completed the ones on that page - click on Save, and then click on Next button at the top of the unit icon screen to scroll to the next page and keep going. You may as well take advantage of the Next button towards the bottom left of the main frame (just under Location data that we are changing) - this will scroll from one unit to the next. When you have finished removing all of the US forces - click on Save and then Exit.
Now back at the Edit Unit Menu, select the Germany - [Axis] Units and do the same for the German forces - removing them all from the scenario. Don't forget the sneaky ones on page 3 of the German Unit Icons page! When all done, click on Save and then Exit.
There should be no active unit data carried over for Great Britain because they don't have any units that enter the map down around Luxembourg. To confirm that we have removed all of the unit data, click on Return to Menu to go back to the Main Menu, and then click on Edit the Map and then toggle the Show Units on and off. If any units show up then it means you missed some! Go back and find out which ones they are and change their location to 0,0.
Well that's it for this tutorial! In the next one we will look at Edit Supply Sources.