
In this tutorial we will look at Objectives. By now you should be familiar with loading an existing scenario, so go ahead and load up the 'Luxembourg' scenario and navigate to the Main Menu. Confirm that the name of the scenario is listed in gray on the right hand side of the main menu panel (as shown below)- if you need a recap on how to load the scenario, please refer to Tutorial 2.
From the main menu, click on Edit Objectives to go to the Edit Objectives Menu.
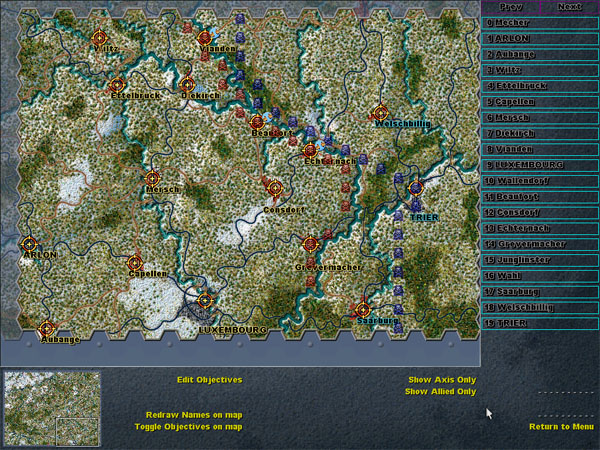
The screen is now divided into 3 main parts, the main window which displays the map, the right panel which displays each of the scenarios objectives, and the bottom panel which shows the Edit Objectives Menu.
Clicking on an objective in the list in the right hand panel will focus that objective on the map. Alternatively, clicking on an objective on the map will highlight that objective in the Objectives List in the right panel.
Looking at the Objectives Menu in the bottom panel, clicking on each of the Show Axis Only and Show Allied Only toggles will filter the objectives listed in the above right hand panel to reflect either; all, axis only, allied only, or none. Go ahead - click on each of the Show Axis Only or Show Allied Only toggles several times to see what effect it has on the list in the right panel. Also on the Objectives Menu, is the ability to Redraw Names on Map and Toggle Objectives on Map. These functions are pretty self explanatory.
The Objectives function within the editor is probably one of the most important. That's because the importance and victory points that you allocate to each objective can have significant impact on the balance and game play of the scenario. The victory points, how long they are active for, and whether any alert points - which will in turn release enemy units - will determine how the scenario should be played, not only by the AI but also by human players.
It is therefore vital that the objectives are well defined and alot of thought is put into the variables that we are about to look at. Remember that the purposes of these tutorials is not to create the most evenly balanced scenario, rather it is to show you - the user - how to use the scenario editor as a tool to create that perfectly balanced battle! To that end, we will not huff and puff over whether Mersch should be active for turns 4-12 or how many points it should be worth to either side.
Ok lets proceed! In the list of objectives in the upper right hand panel, click on the objective named Wiltz (you may need to toggle Show Allied Only on or off to bring it up in the list). This should now highlight Wiltz on the map so you can see where it is. Now click on the objective called Mecher (again, you may need to toggle Show Axis Only to display it in the list). This in turn should now show you on the map where Mecher is. Notice something different? Mecher doesn't appear to be a town, nor does it have a name next to it on the map. And furthermore, when you click on the Toggle Objectives on Map, it doesn't bring up an objective indicator for Mecher. Why is that? Lets have a look.
With Mecher selected as the active objective in the upper right hand panel, now click on Edit Objectives on the bottom menu to bring up the Edit Objectives Screen as shown below.
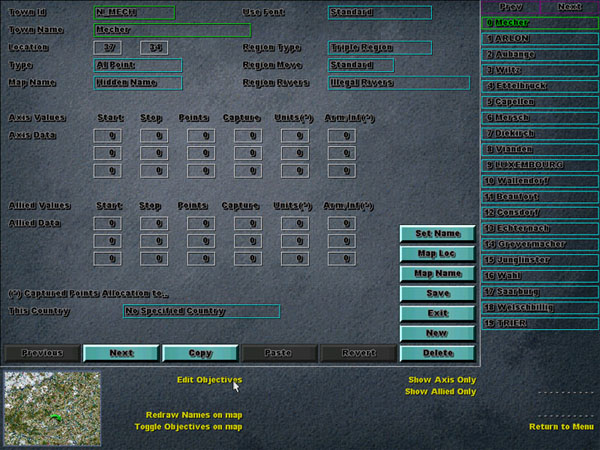
Look for the entries titled Type and Map Name, they should be 4th and 5th from the top respectively. Type should be set to AI Point and Map Name should be set to Hidden Name. Arhh - its staring to make some sense now. Looks like the objective Mecher is an AI rally point only, its name is hidden so that it doesn't show up on the map - in fact you have probably even played the Ardennes Offensive and never even known that an objective for Mecher existed! A further look around at the other settings for this objective confirms it all. There are no victory points assigned to this objective for either side.. so we were right. It would seem that this objective has been set to help with directing the AI to this region of the map!
Interesting - we will talk a lot more about this a bit later. For the time being, lets explore and explain some more of these Objective settings. But lets select a 'proper' objective - one with some victory points already allocated to it. Click on and select Wiltz in the right hand panel. The details in the main frame should update to reflect those as they relate to Wiltz now.
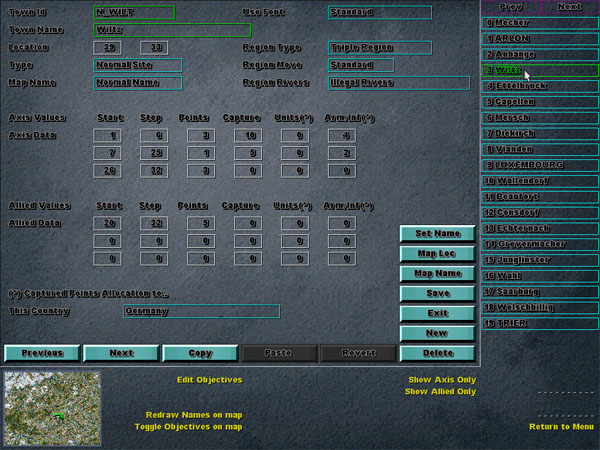
Town Id : This is a Id that is used internally by the engine. You can enter any unique reference here.
Town Name : The name that you enter here for the objective is the name that will appear on the Map. Usually the name is the name of the town or name of the location of the objective (ie: Cross Roads, Hill 242 etc). After entering the name in this field, you should click on the Set Name Button to update the name of the objective in the right hand panel list.
Location : These are the hex coordinates of the Objective. Clicking on the Map Loc Button will enable you to place the new location of the objective on the map, thus updating the location information.
Type : Allows you to defines the type of the objective. Clicking in the Type Box enables a drop down menu where you can choose between Normal or AI Point. Assigning the objective as an AI Point means that the objective does not operate as a normal objective and will not show up on the map as an objective.
Map Name : Clicking in the Map Name Box enables a drop down menu where you can choose from Normal Name or Hidden Name. Selecting Hidden Name removes the name of the objective from the map. This should be set to hidden for AI Point objectives, as there is usually no need to have the names of those points appear on the map.
Font : Allows you to choose, from a drop down menu, the type of font to use in the display of this objective name on the map. You could choose Normal font for major objectives, and Small or Medium font for those less important objectives. This could be an effective tool to assist those playing your scenarios in seeing at a glance what the major objectives are.
We wont look at the Region Type, Region Moves or Region Rivers settings right now. They deserve a tutorial all of their own and we will look at them later in Tutorial 5.
The rest of the screen is laid out with the Axis and Allied settings in terms of Start and End turns for Victory Points, Capture Points and Alert Points. Let's look at the settings for Wiltz to explain them.
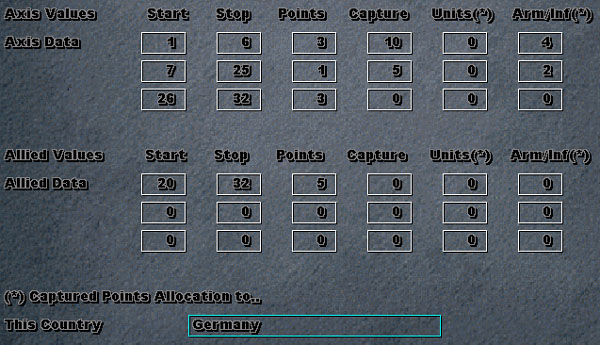
These settings are what defines the true value of the objective to both the Allies and Axis. Each objective can have 3 active phases - reflected by a start and an end turn for each phase. In addition to this, you can set the points awarded for each turn that a side holds the objective for that phase, the amount of points that is awarded for the capture of the objective in that phase and the consequences of capturing that objective in that phase. This is reflected through the allocation of Alert Points.
The options with these settings are endless - and in my opinion are some of the most crucial settings for your scenario. Simple changes to these values can completely change the balance and play of a scenario.
In the example above, we can see that the Axis have 3 active phases for this objective. Phase one is from turn 1 to 6 and will award the Axis with 3 points for each turn that they hold the objective for that phase, they will also receive 10 points if they first capture the objective during those turns, and 4 alert points will be awarded towards replacements. The bottom of the screen tells us that any Alert Point in relation to this objective will be awarded to Germany.
Phase two for the Axis says that they will receive 1 point each turn that they hold the objective between turns 7 and 25. If the objective was originally captured during these turns they will receive 5 points for capturing it and 2 Alert Points that will go towards replacements.
Phase three for the Axis is active from turns 26 to 32 and they will receive 3 victory points for each turn they hold it during this phase. If they have been slack and they only originally capture this objective during this phase they will not be rewarded with any capture or Alert Points.
Looking at these three different phases it appears that the scenario designer feels that the Axis need to push for the objective (Wiltz) during turns 1 to 6 and are rewarded through victory and alert points for any success. Turns 7 to 25 it appears that the Axis would have little difficulty in holding the objective and in turns 26 to 32 it looks like the Axis are again rewarded for holding the town through an expected that an Allied counter attack.
The data for the Allies seems to confirm the provisions of a counter attack. The Allies have one active Phase, that being between turns 20 to 32 where they are rewarded with 5 victory points for each turn that they hold the objective.
Note that Capture and Alert Points are only awarded once when the objective is originally captured by the relevant side.
Well That's objectives explained - except for the Region information which we will cover in the next tutorial.
In terms of this scenario though, feel free to go ahead and amend the different points values for each of the objectives. Its difficult a this stage to correctly determine what the settings should be - it will depend upon the balance of units that we assign to each side. It will also become more apparent after play testing - which objectives may need further tweaking. So for now, I'm not going to change any of the points settings - I may come back at the end and play around with them. You can set them as you see fit now.