
In this tutorial we will look at Supply Sources. By now you should be familiar with loading an existing scenario, so go ahead and load up the 'Luxembourg' scenario and navigate to the Main Menu. Confirm that you the name of the scenario is listed in gray on the right hand side of the main menu panel (as shown below)- if you need a recap on how to load the scenario, please refer to Tutorial 2.
From the main menu, click on Edit Supply Source to go to the Supply Source Menu.
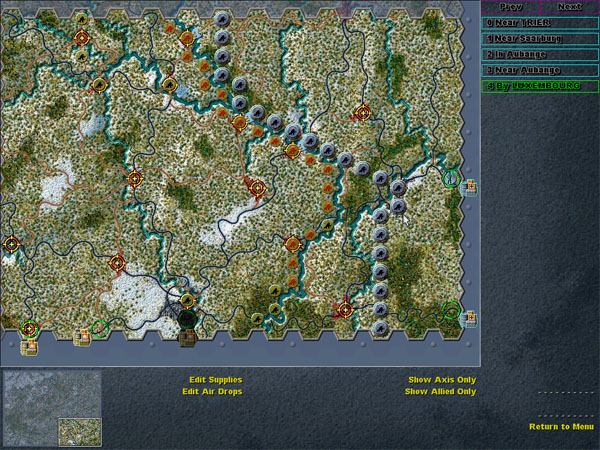
The Supply Source Menu lists in the right hand panel all of the current Supply Sources currently active in the scenario. There are currently five of these active that have been carried over from the Ardennes Battle Set. Clicking on each in turn you can cycle through these supply sources - you can also see that each of these supply sources are represented by Supply Dump icons on the Map. You will notice that they are all located on the extremities of the Map (the southern and eastern edges).
You should also notice that there are currently no supply sources on the northern or western part of the map. Why is this? Its simple! Remember when we created this scenario it carried over data from the Ardennes Battle Set - hence the current supply sources on the eastern and southern edges. But in the Ardennes Battle Set there were no Supply Sources in the coordinates that we set for the northern and western edges of our scenario. This is because the larger Ardennes map extends further west and north then our smaller scenario map does.
We will therefore have to add supply sources to the north and west of our map edges. But before we do that, lets have a look at some of the other options available from the Supply Source Menu.
As shown above, there are two rows of options, (excluding the Return to Menu option); Edit Supplies, Edit Air Drops, Show Axis Only and Show Allied Only.
The two Show Axis Only and Show Allied Only are simply filters for Supply Sources listed above in the right hand panel. Click on either of them now and see what happens. They act as toggles, so if you click on them both you can effectively remove both Allied and Axis Supply Sources from being listed. Click on each of them again to display each sides supply sources.
So lets now go ahead and add some supply sources. It makes sense to add a supply source on each of the map edges where the road leave the map. So we are going to do that along the north and west map boarders. We will use the historical frontline, which follows the river running a rough north south through the map - the one with the mine hexes on either side of it. Anything to the east of that river we will make a German supply source, and anything west of the river we will make a US supply source.
Click on Edit Supplies to bring up the Supply Source Data Screen.
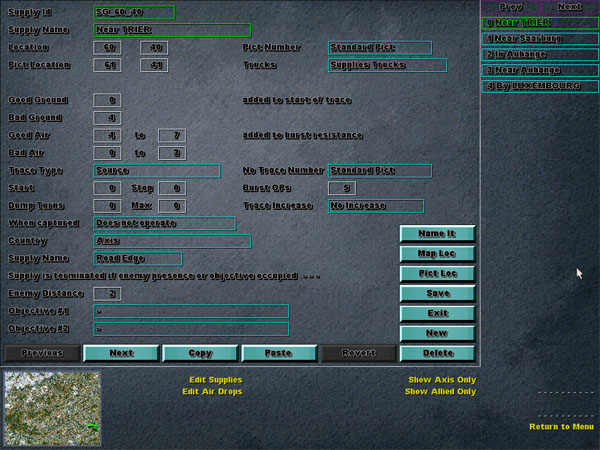
In the main frame is the data entry window, the bottom panel shows the Supply Source Menu, and the right panel lists all of the currently active Supply Sources. Click on each of the names in the right panel and notice how some of the data changes in the main frame. One of the variables in the main data entry frame is Country. Notice how this changes as you click on some of the supply sources. This variable is used to specifiy which country the supply source relates to.
The first supply source that we want to add with be an Axis one. The best way to make a new Supply Source is to copy an existing one. So let's select an existing German supply source from the right panel. Click on 0 Near Trier to bring its details up in the Main Data Window - your screen should now look like the image above.
Now click on the Copy Button which is located towards the bottom of the main frame, and then click on New - to add a new Supply Source and now cick on Paste to paste the copied data into the new Supply Source. Notice that the name of this newly created supply source is the same as the one we copied from? So is all of the other data relating to to it, including the map location. So lets go ahead and change the map location of our new supply source.
Click on Map Location, you should be taken back to the map and your cursor will have changed into a target symbol hex with cross hairs in it. Also notice at the very top of right hand panel the hex coordinates will be displayed and will follow the movements of your cursor. We want to allocate this new Supply Source to hex 60,32 - which is the one right up in the north east corner of the map. It is the hex where the road leaves the edge of the map in the top right hand corner. So click in that hex with the cursor and you should be taken back to the Supply Source data entry window.
Once you have done that - you can now click on the Name It button and the name of our new supply source will be updated. We arent finished yet though! We now want to set the location of the Supply Source Picture. So click on Pict Location and then select the hex just to the north of the one we selected as the supply source - it should be the one that is just off to the north of the map edge - hex 60,31, and we are done! You can now click on Save if you like.
That is the easy way of creating new Supply Sources. You should now go ahead and enter German Supply Sources for hexes: 54,32; 53,32; and 48, 32. Then go ahead and create supply sources for the Allies (dont forget to copy from an Allied Supply Source now and not a German one!) in hexes : 35,44; 35,39; 35,36; 35,32 and finally 39,32. I will leave it to you to decide if you want to allocate supply sources for hexes 43,42 and 32,42.
Thats all of the easy stuff explained. For a more detailed look at some of the other settings in the Supply Source Screen, see below.
For the time being, lets move onto Tutorial 4.
What follows is a more detailed explaination of the Supply Source Settings. It is presumed that you have an understanding of how supply works in the game environment - including how supply is distrubuted from supply sources to supply trucks and then finally to units. For a more detailed understanding of these gaming concepts please refer to the Korsun Pocket User Manual.
Supply Ids : No Required
Supply Name : Here you can choose to name your supply source - note that the name can be auto generated by clicking on the Name It Button.
Location : Hex Coordinates of the Supply Source location.
Pict Location : Hex Coordinates of the Supply Source Picture.
Pict Number : Here you can specify the graphic to be used in the hex defined at Pic Location above.
Trucks : Does this supply source supply trucks, or is it a Dump Only. Dump only supply sources can not supply trucks, they can only distrubute supplies to surrounding units.
Good Ground : The value of OPs added to the start of the trace from the Supply Source to supply trucks in good ground conditions. Valid entry is a number between 0 and 25, although 0 to 10 is generally more realistic. Note that any value entered here greater then 0 will effectively mean that the 20% supply bonus does not apply. Unless your scenario is meant to replicates supply problems during good weather, this entry is recommended to be set to 0 - to reflect normal supply.
Bad Ground : The value of OPs added to the start of the trace from the Supply Source to supply trucks in bad ground conditions. Valid entry is a number between 0 and 25, although 0 to 10 is generally more realistic. Note that any value entered here greater then 0 will effectively mean that the 20% supply bonus does not apply. Tthis entry is recommended to be set higher then that set for good weather - to reflect supply difficulties during bad weather conditions.
Good Air : Entered as X and Y numbers, specifies the amount of burst resistance (randomly determined between X and Y settings) added to this supply source in good air conditions.
Bad Air : Entered as X and Y numbers, specifies the amount of burst resistance (randomly determined between X and Y settings) added to this supply source in bad air conditions.
Trace Type : Defines the type of trace required for this Source to operate. The Source setting means that it is a supply source, Trace to Operate means that it must be able to trace a path back to a supply source to operate, and Dump means that it will only operate as a supply dump.
No Trace Type : Specifies an alternate graphic to indicate when the the supply source is no longer able to trace a path back to another supply source (for example when Korsun Airfield is not longer able to trace a path back to a map edge supply source, a graphic of an aircraft is shown to indicate that it is now acting as an air lifted dump.
Start and Stop : Specifies which turns this supply source will operate for. Entering 0 and 0 negates this feature.
Burst OPs : Indicates the number of OPs that are allocated to this supply source.
Dump Turns : Specifies the number of turns that this source will operate as a dump for when it can not trace a path back to a supply source. Think of this as the amount of supply reserves that the dump can hold. A setting of 5 means that they have 5 turns worth of supplies held in the dump.
Max : Specifies the maximum number of turns the dump can operate for. Usually this value is the same as that found in Dump Turns - although it can be different.
Trace Increase : This setting indicates the number of supply turns added back to the dump after it is again able to trace a path back to a supply source. Valid settings are No Increase, Increase +1, Increase +2 and Increase +3.
|
For example, lets say Bastogne in TAO is specified as a Supply Source. Its setting up as a "Dump" - so therefore cant supply trucks, and it's trace type is set to "Trace to Operate". In addition, its Dump Turns are set to 10 and its Max Turns is also set to 10. It has a Burst OP setting of 12 and no Start or Stop turns have been specified. Furthermore, lets say its Trace Increase is set to Increase +3. So what this means is that Bastogne can operate as a supply dump - it is unable to provide supply to supply trucks but it can supply units around it with its burst of 23 OPs. When Bastogne becomes surrounded and is no longer able to trace a path back to another supply source (a map edge supply source for example), it will operate as a Supply Dump irrespective of what turn it is. Although it will only operate as a dump for 10 turns. Let's say that after the 6th turn of being cut off, and with only 4 turns worth of supplies left (10-6=4), the Allies launch a counter attack against the German forces and they force the Germans to retreat. This opens up a supply trace path back to a map edge supply source. Bastogne is now able to recieve supplies from another Supply Source. The Trace Increase setting of Increase +3 means that they are able to restock their reserve supplies (Dump Turns) in the town at a rate of 3 per turn. They have a Maxium setting of 10 - so they can restock their Dump Turns back up to 10. Allowing them to survive for another 10 turns if they are ever cut off again. Understood? Good! Lets make it a bit more difficult. Lets say that Bastogne has the same settings explained above, their Dump Turns is 10 but this time their Max settings is 5. Following the same scenario as described above, this time though, because their Max setting for Dump Turns is 5 - it means that after they have been rescued by their Allied comrads, they will only be able to restock up to 5 turns and not the original 10 that they started off with. Meaning if they are ever cut off again and have to operate as a dump, they will only be able to operate for 5 times and not the original 10 like they were able to the first time they were cut off. |
When Captured : Specifies what happens to the Supply Source when it is captured by the enemy.
Country : Specifies who this Supply Source operate for.
Supply Name : Has no function in the game - is used just to indicate to you the scenario designer what sort of supply source it is.
Enemy Distance : Indicates the number of hex an enemy unit needs to get to the Supply Source for supply to terminate.
Objective # 1 : If set, when the enemy captures the specified objective, the supply source will terminate.
Objective # 2 : If set, when the enemy captures Objective #1 and this objective, the supply source will terminate.
Phew! Thats it for Edit Supplies! If you have read this far
- then you probably want to know about Air Drops too right?
Click on Edit Air Drops and we will have a quick run through.
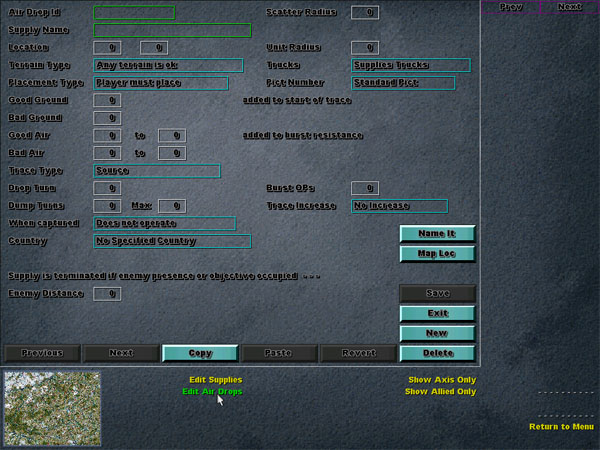
Most of these settings are the same as those found in the Edit Supplies listing above, lets have a look at some of the differences.
Terrain Type : Allows you to restrict air drops to specific terrain types.
Placement Type : Allows you to specify if the Air Dropped Supply Source will be automatic, or if it will be placed by the player.
Scatter Radius : Scatter has to do with the legality of placing the drop zone. If it is not automatic it means that the player may place the drop zone in any legal hex within the scatter value of the supply dump location. Autodrop will place the drop zone in a legal hex at random within this area.
Unit Radius : When units drop they will all attempt to land in an area surrounding the drop zone defined by this unit radius.
All other settings are the same as those listed for Edit Supplies. Thats it for Supply Sources.