Breaking
into Festung Europa (A Guided tour for invading Europe!)
For the Allied player gaining a foothold in Normandy is the
order of the day for 6 June! In order to satisfactorily accomplish this mission
a through analysis of each landing beach is needed. What follows is one look at how to make the most of your turn
one in SSG’s Battles in Normandy Overlord campaign.
Overall
Situation
How the Allied player breaks into Normandy during the first
two days will set the tone for the campaign.
Excel during this time and the German player is in a world of hurt…
stuff it up badly and a second Dunkirk may be in order!
Attacking Forces:
The Allied player has 11 division equivalents (7 infantry divisions, 3 airborne
divisions, and the British equivalent of an armored division) to take control of
five landing beaches on D-Day. Additionally
3 infantry divisions and a British armored division will arrive on 7 June.
The British can land two corps supply units on D-Day while the Americans
have two supply units available to land on 7 June.
Defending Forces:
German player has 7 infantry divisions and 3 panzer divisions available
to halt the Allied Invasion during the critical first two days.
Allied Supply:
Allies have a very limited supply capability for the first week to 10
days. Securing beachheads and
expanding the road network are the keys to Allied success until the Mulberrys
and enhanced supply units arrive around 15 June.
Critically important is the ability to take replacements at Utah Beach
which can only be done by creating an uninterrupted road network to the Omaha
Beach supply source.
Allied Airborne
Troops: These elite units took a long time to train and did not use
replacements from the ordinary manpower pool.
For thios reason, airborne replacements are simply not available for the
entire campaign. The only way these high quality units regain strength after
taking step losses is by using their internal timed replacements.
Once the timed replacements are used up, the airborne units will start
taking permanent losses during further combat.
Airpower:
Allies are able to dominate the skies over Normandy.
By using air interdiction carefully the Allied player can strongly
influence the German supply situation and movement of combat units
The
Allies have three objectives to be completed by the troops that land at Utah
beach. These are:
Objectives
1 and 2 are closely linked, since Carentan controls the road network that will
be needed for Allied logistics. Carentan is also worth 20 VPs per turn for the
Axis.
Objectives
3 and 4 are almost diametrically opposed to objectives 1 and 2, as combat units
cannot contribute to both at the same time. The capture of Carentan is normally
the most important although if it is defended to the utmost it is possible to
obtain supplies from Cherbourg four turns after its capture. It is possible to
capture Cherbourg without cutting the peninsula.
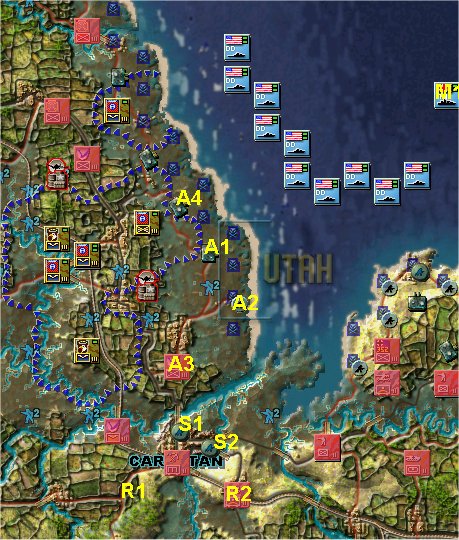
It is hard to formulate on overall tactical plan for the landing at Utah, since the locations of your para units are very variable. As the Allied player though, you have the consolation of knowing that Utah is the easiest beach to land at, and one at which it’s hard to do anything disastrous on the beach itself.
Examine
the map that accompanies this article. There are eight steps marked A1, A2 and
A3 that can cause attrition on your landing on hex (29,21). Hex (29,21),
labelled A2, is probably the most desirable spot for a landing, being closest to
Carentan and having a road right into the hex. Unfortunately, all eight enemy
steps can cause attrition to this hex.
Depending
on where your paras land, the 1058 Grenadier unit at hex A3 (27,23) can
sometimes be persuaded to move on. Naval gunfire can play a big part in this
less than gentle persuasion, and any retreat result will move the unit out of
attrition range.
If the
1058 Grenadier is moved, then with sufficient bombardment it is possible to
render hex A2 attrition free. However, this is not necessarily a good idea.
Naval assets are at premium on Turn 1, so consider landing a stack at hex
(29,20) immediately north of hex A2, and assaulting hex A2 after landing. You
should be able to get a guaranteed overrun kill on the lone strongpoint there.
If the
Grenadiers prove stubborn, or you do not have the strength to move them, then
destruction of the strongpoints at A1 and A2 and the removal of a single step
from the strongpoint at hex (27,18) marked A4, will allow landing without
attrition at the two northenmost hexes of the beachhead.
Consider
the other beaches. Utah is relatively easy, but every ship used here is not
available elsewhere, especially at Omaha where conditions are tougher.
US
Engineer and Ranger units can clear minefields in one turn, if there are no
enemy units adjacent. All beachhead hexes are mined, but land Engineers or
Rangers on hexes critical to your follow up units.
The
vital hexes at (27,25) and (28,25) marked S1 and S2 on the map are
inconveniently protected by strongpoints. They appear to be out of range of
naval bombardment, but this is not so. There are two ships, the monitors HMS
Erebus (36,14) and HMS Roberts (69,12) which if moved to the hex marked M1
(36,14) can bombard hexes S1 and S2. This will make the conquest of Carentan
much easier.
There
are only two roads into Carentan, marked R1 and R2 on the map. If you can get
close enough to either road to exert OP penalties and prevent supply getting
through, then some judiciously placed Air Interdiction will place the defenders
of Carentan under a lot pressure. Remember though, the defenders will not use a
bullet unless attacked, you may have to do some lower odds attacks in order to
force the issue.