The
field guides are not very encouraging regarding an outing to Omaha Beach. They
point out the many strongpoints and minefields that cover all landing points.
They also remark upon the presence of the 352nd Infantry Divison in
the area, and specifically the 916th Regiment, sitting adjacent to
the best beach hexes.
Those
insist on making the trip would do well to distribute bottles of good whiskey to
all warships in the vicinity, because it is only with help from the firepower of
the various navies that anyone will get ashore at Omaha.
The
units landing at Omaha have three objectives.
1. Capture Isigny and open a route thru Carentan in order
to link up with Utah Beach forces.
2. Link up with British Gold Beach forces near Bayeux.
3. Capture St. Lo.
Objective 1 is what its really all about. Unless you have
appalling luck the Axis won’t really be in a position to stop Objective 2, and
Objective 3 is somewhat long term.
Getting
ashore at Omaha is the tricky bit. Once ashore, there isn’t a great deal of
subtlety. Any Germans in front of you must be moved out of the way, and the
beachhead expanded until it meets the Brits to the east and runs into Carentan
in the west.
The
Germans might try to rush the beachhead and make a nuisance of themselves
(although the AI has more sense than to do this). If this happens, don’t
panic. You have some overwhelming weapons at your disposal.
Firstly,
there’s the large flotilla of seaborne artillery. As early as Turn 2, this is
mostly available for combat support, though some ships will still be needed to
remove strongpoints.
Secondly, there is the comforting blanket of air interdiction. You should be able to ensure that no German units that get close to the beach ever get any supply. Lastly, your infantry regiments have four bullets each, so they can fight for a long time without supply. Regiments of the 352nd have only two bullets. If they entrench and are then attacked in the same turn, they’ve already used those two bullets. If they can’t resupply because of interdiction, then they’ll be isolated and they’ll be toast.
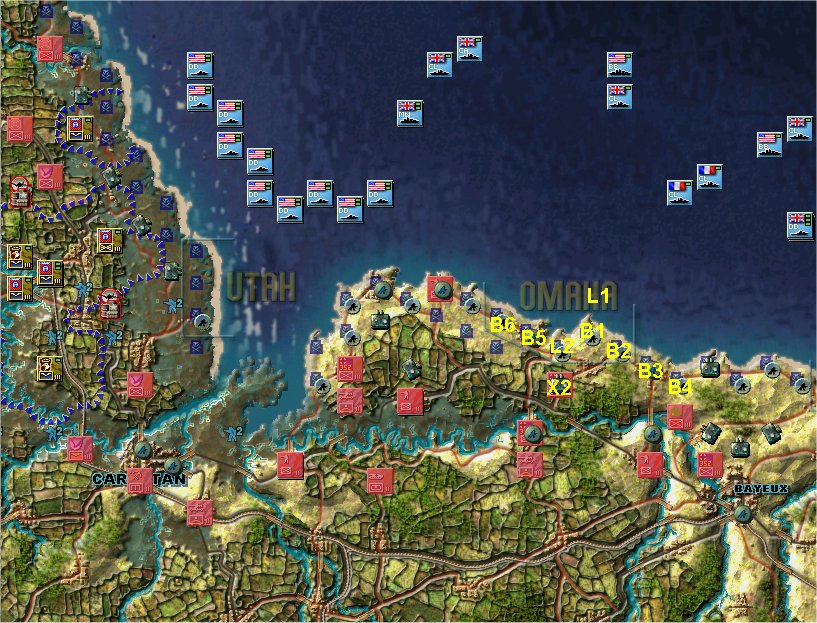
This is
the tricky bit. The defences consist of both real units and strongpoints. You
can’t do anything about the units until you land, so its imperative to
formulate an optimum strategy for dealing with the strongpoints.
To do
this we must analyse the disposition of the defences, remembering that those
units landing on the first two turns suffer attrition from all steps within 3
hexes. When we do this, we see that the point of least attrition is hex (42,21).
This is marked on the map as B1(immediately below the hex marked L1). If you destroy the strongpoint this hex (it’s
also labelled B1) and all the other strongpoints labelled B2 to B6 and you take
2 steps from the stronpoint labelled X2, then you can land a division at B1 with
only one dice of attrition per unit.
To do
this takes a fair amount of naval firepower, and you may not wish to allocate
this much of a scarce resource to just one beach, or you might consider reducing
attrition to only two dice at this point, and seeing how other beaches go,
before returning to Omaha to finish the job.
Note
also that the strongpoint at hex L2 (41,22) is not marked for bombardment. When
your division lands, you should be able to get an overrun on this hex and
destroy it with conventional combat, thus saving ships for more vital tasks.
If you
don’t destroy any more Omaha strongpoints, the troops landing at L2 will face
3 dice of attrition, and another 3 steps will have to be destroyed to reduce
that to two. This level of bombardment may not be available, which is why it is
best to proceed cautiously with your landings, pausing often to consider what
has been achieved already and what remains to be done.
As with
Utah, land Engineers or Rangers on any hex that won’t be adjacent to an enemy,
to clear the minefield in one turn.
Once you
have two divisions ashore, you have to consider the fate of the non-divional
troops that have yet to land. Here I have to say that expert opinion is divided.
Pterrok says ‘land everything with two or more steps’. JSS says, with the
exception of four step units, only ever land where there is one more step than
attrition dice. Both simple rules, but you’ll have to decide which suits your
style of play more.
In
favour of the land everything approach is that
your men get ashore quicker, they start reducing minefields quicker and
they’re available for immediate combat. In favour of the more conservative
approach is that the men land slower, but Day Two landings will almost always be
attrition free, so your men are guaranteed to be in good shape when they do get
ashore.
The
choice probably comes down to how lucky you are feeling!