Butlins Beach
Holiday Fun (Normandy Division)
A request for anything more
sophisticated or life sustaining than a can of SPAM in wartime Britain was
invariably met with a refusal, accompanied by the following rejoinder: ‘there’s
a war on, you know!’.
So it’s no surprise that, in the spirit
of wartime austerity, those intrepid souls wishing to enjoy the beaches of
Normandy had to take all their own supplies and dislodge some heavily armed
defenders before establishing themselves ashore.
Admittedly, this task was somewhat
easier for the British than for the Americans. The British beaches were not as
fortified as Omaha, and had fewer real defenders. On the other hand, one Panzer
division lurked in the vicinity, and others were not far away, so a speedy and
well organized landing was essential if disaster was to be avoided.
Since the British beaches were close and
interrelated, all three beaches will dealt with in the one article.
Units landing at Gold beach have four
objectives.
As with the American beaches, it is
imperative to conserve the use of naval bombardment. Attacks must be planned to
do this, and used in conjunction with units from other beaches. Only Recon units
can be relied upon to be able to move after landing, and this capability must be
fully exploited. Also, care must be taken not to land immobile units too early,
which might block other, higher value units.
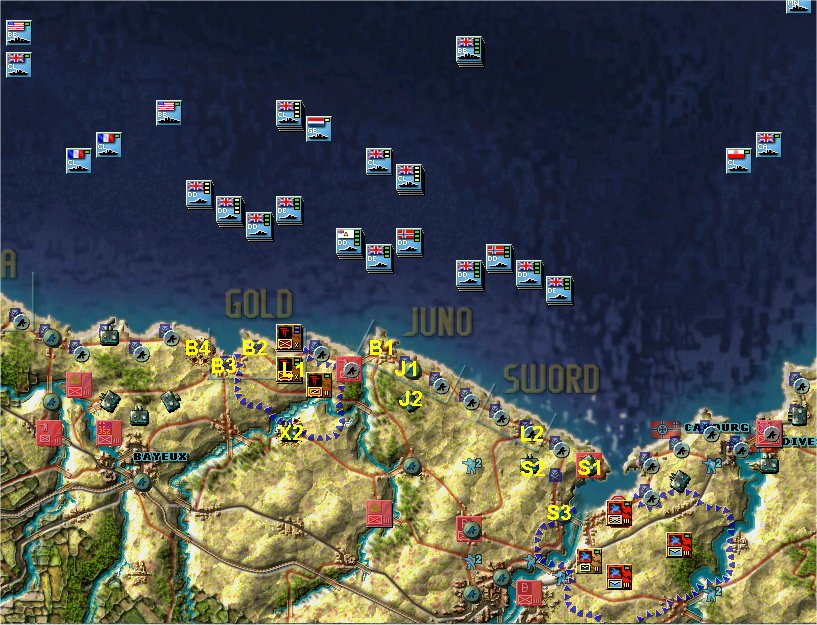
Examine Map 1. You must destroy the
Strongpoints at B1, B2, B3 and B4, take two steps from the Strongpoint at X2
(52,25) and destroy the strongpoint at L1 (52,23) which becomes the landing
point. Note that hex B1 is actually on Juno beach, but we are all one big happy
family here, and are happy to help out.
If these tasks are completed, there will
only be 5 steps within 3 hexes of our landing point, which equates to only one
dice of attrition. Land the 61 Recon/50th Infantry and move it to hex
(53,24) as shown. Land the 50 Composite Armour and one Regiment of the 50th
Infantry at hex L1. Even if you take losses, you should be in a position to get
an overrun, with a tank bonus, on the Strongpoint at (53,23). You must make this
attack an overrun with no possibility of failure because the Recon unit is also
needed to help the landing on Juno by attacking the Strongpoint and Ost
battalion at (53,24) in due course.
Do not land any more units at this time,
as attacks on Juno should reduce attrition on Gold to zero, so there’s no point
taking unnecessary risks. Remember, we want to land our XXX Corps Supply unit on
Turn 1.
There are three Juno Beach objectives.
These are essentially the same as those
for Gold beach.
Juno Beach Landing.
Examine Map 1. The Strongpoint J1
(56,23) must be eliminated to reduce attrition to two dice. If you have the
bombardment capacity left, then eliminating Strongpoint J2 will reduce attrition
to one dice, but this may not be possible.
Either way, you are now in a position to
land at hex B1 (55,23). Land the 2 (C) Armour brigade and one regiment of the 3rd
Canadian Infantry to hex B1. Land the 1 (C) Recon unit and move it to hex
(55,24). These units, along with the Recon unit from Gold beach are now in a
position to get overruns on the Strongpoint and Ost battalion at (54,23). It is
worth allocating one DD to the combat against the Ost battalion to ensure its
destruction.
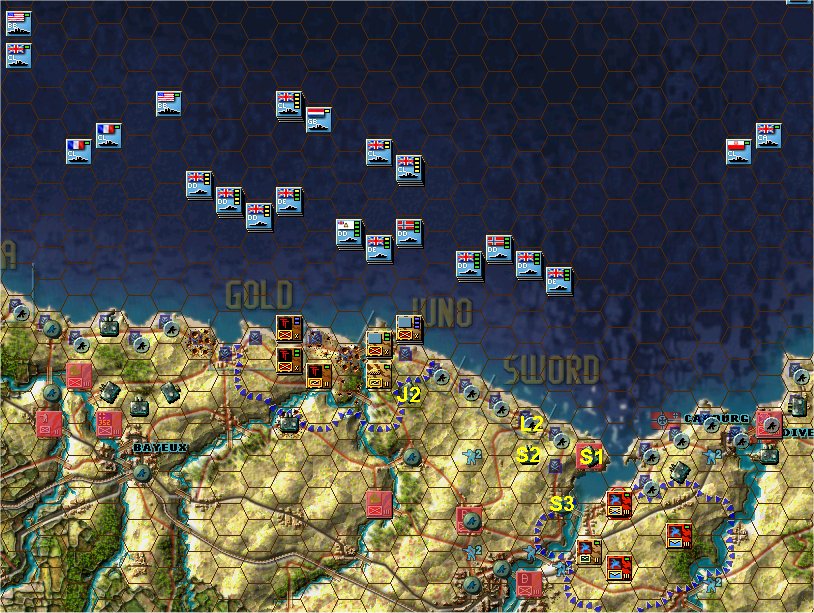
At the conclusion of the combat, your
landing should look like Map 2. Again, there is no point in landing the rest of
your units immediately, as future results may further reduce the attrition risk.
There is also the possibility of landing units at (56,23) and taking out the
Strongpoint at (57,24)
There are two main objectives for the
Sword beach forces.
The tactical situation at Sword beach
neatly illustrates an important point. Beaches are generally defended by a
mixture of 1, 2 or 3 step Strongpoints. The 1 step Strongpoints are very
vulnerable to attack by combat units and also have little or no anti-tank
strength. The larger Strongpoints are much harder to assault, but all are
equally vulnerable to naval gunfire. It therefore follows that out of the
different Strongpoints within attrition range of your landing hex, the larger
Strongpoints should hit by naval bombardment, and, wherever possible, the 1 step
Strongpoints taken out by your landing forces.
Sword Beach Landings.
Examine Map 2. The 3 step Strongpoints
at S1 and S2 must be destroyed, along with the 2 step Strongpoint at S3. The
Strongpoint at S3, the town of Benouville at (61,28) goes in accordance with our
principles of Strongpoint destruction, but also to provide an exit strategy for
the Airborne who are probably on the other side of the Orne. Sometimes the paras
can help in reducing this Strongpoint, depending on where they land, but
otherwise the task must fall to the four British battleships. Collect these BBs
and move them to hex (58,13) from where they can reach this and other important
targets. Don’t shoot the BBs at anything else until they have performed this
vital task.
Land two regiments of the 3rd
Infantry, one Commando unit (not the Engineer) and the 3 Composite Armor unit at
hex L2 (60,25). Unless your naval shooting has gone exceptionally well you will
be facing two attrition dice, so we don’t want to risk our vital Engineer unit
when we don’t have to. Move the armor and Commando unit to hex (59,26) and
overrun the Strongpoint on the beach at (59,25).
The next step involves landing the Recon
unit from the 3rd Infantry and moving it to hex (60,26) and taking
out the other Strongpoint at (61,26). There could easily be two dice attrition
attached to this move, so now might be the time to assess what defences remain,
what ships haven’t fired and what is the most cost effective way to commit your
final assets.
Make sure that you land the 249 Combat
Engineer on the supply hex at (60,25). This will get rid of its minefield in one
turn.
With any luck, your initial landing
phase will end up looking like Map 3. As mentioned before, you should now
carefully examine your remaining options.
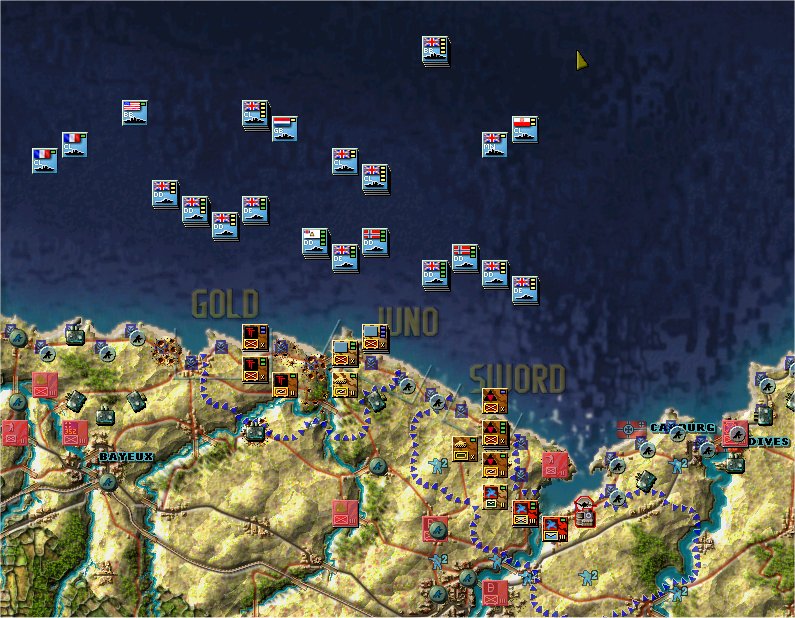
These are as follows: