As the Axis player in Operation Husky, you have two massive handicaps to deal with, and two bonuses to help you overcome adversity.
Your first problem ,and there’s no getting away from it, is the morale of your Italian troops. Many of them are, quite sensibly, reluctant to die for either Mussolini’s new Roman Empire or Hitler’s Third Reich. You must acknowledge this in your troop dispositions, or you will pay the price. Refer to Section 24.4 of the manual if you are uncertain about the surrender rules. The practical outcome is that you should always stack sub-standard Italian units with regular Italian or German units, to avoid the 70% surrender chance for an unsupported, sub-standard stack. It is usually better to leave a gap in your lines than to have units surrender out of hand. Even if some units end up surrounded and assaulted, that process still takes time, consumes enemy supplies and can cause enemy casualties, whereas a surrender is even better than an overrun for the enemy, as it doesn’t even use artillery.
The second problem is that you have zero chance of preventing the landings, and nowhere near enough units to provide a cohesive defense line. This is not an unfamiliar circumstance for Axis players, so you’ll just have to make the best of it.
Your first advantage is that nobody expects you to sweep the invaders into the sea or even to defend the island for any great length of time. You might get some fervent messages along those lines from Mussolini, but these can be ignored because the Germans are really in charge. A delaying action is all that’s required here, and this is achievable.
Your second advantage is that the terrain massively favors just such a delaying action. There are lots of mountains, very few roads and Mount Etna is ideally placed to anchor your defensive lines as you fall back towards Messina. Allied airpower is not overwhelming and Allied naval power only sporadically useful, which will help your defensive efforts.
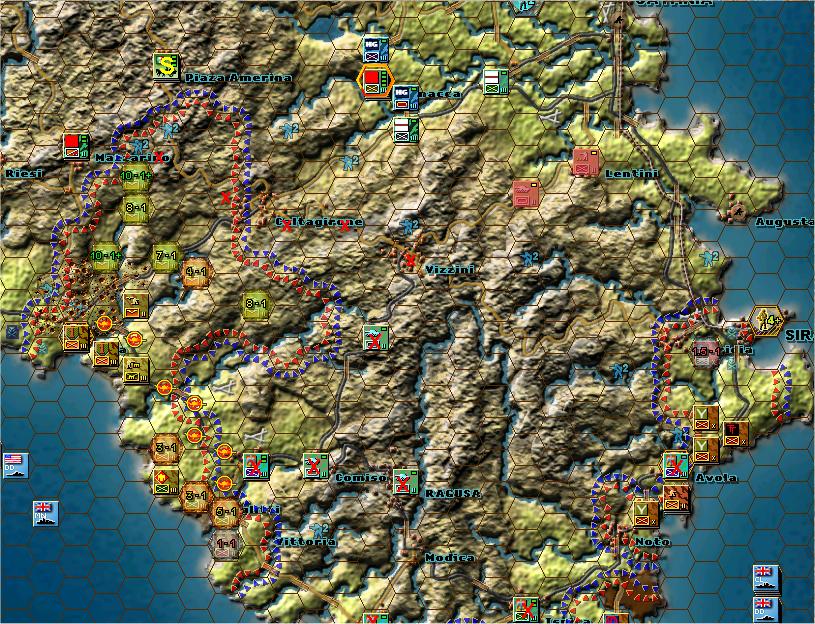
Map 1 shows the situation which will confront you at the start of Turn 1.
The units marked with a large red ‘X’ should all run away as fast as they can. They are all substandard, so if they hang around they can be guaranteed to end up in the POW camp. They are needed to help create our first defense line, which will run roughly from VIZZINI to CALTAGIRONE to MAZZARINO, marked on the map by the lower case ‘x’.
The situation shown on this map is the most favorable than can exist for the Axis, where the scatter of the Allied airborne troops has alerted the Herman Goring and other Axis units around RAMACCA. When this happens, there are some tempting opportunities for immediate counter-attacks, as shown by the Combat Advisor odds. Playing against the AI you should always attack, playing against a human player calls for a more judicious approach. However, you must bear in mind that the sole German supply truck doesn’t even arrive until Turn 4, and then in MESSINA. Therefore, any counter-attacks by Germans should be restricted to overruns, to avoid embarrassing supply problems, especially against human players who can finesse their interdiction placement.
The Italian 16 Corps (It) Supply unit at PIZA AMERINA, marked by a yellow ‘S’ is a critical unit. There are large numbers of Italian units in the western half of Sicily who are needed to contain the American attackers, and to prevent them from making an easy end run to PALERMO. These units don’t have a supply truck with them, so move this west on Turn 1, before American advances make this impossible.
Examine Map 2, which shows the situation at the end of Turn 4. On the eastern half of the battlefield, a nice defense line has been constructed, marked on the map by ‘x’. Note that only one hex of this line is in clear terrain, and to attack this hex, the enemy must occupy the hex marked ‘T’, allowing plenty of scope for local counter-attacks.
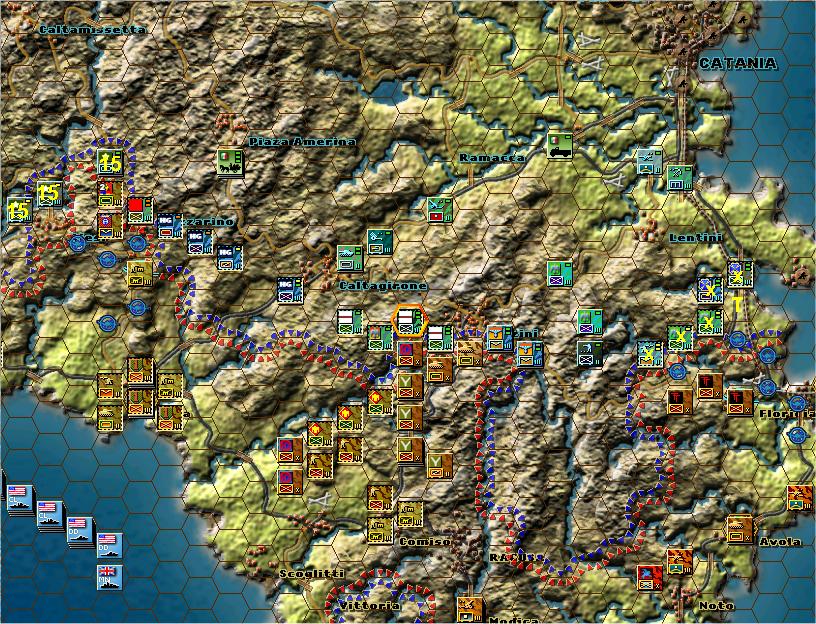
In the west, note the arrival of the 15th Panzer Grenadier division, marked by ‘15’. This unit starts a fair way to the west, but it’s a good idea to move it eastwards for a couple of reasons. Firstly, as previously noted, there is only one German supply truck, so it is simply too logistically risky to have German units fighting on two fronts or risking easy interdiction of their supplies. Secondly, the 15th Panzer Grenadier and the Herman Goring divisions are your best attacking units, and having them able to support each other will give the Allied player some headaches.
Now examine Map 3, which shows the firming up of the western defense line. The burden of defense here falls entirely on those few Italian units who are not substandard, so great care must be taken to preserve them for as long as possible. Some of these units will also be necessary for the defense of PALERMO and again, it is important that each defended city hex contain at least one non-surrendering unit. Each non-surrendering unit must be stacked with a sub-standard unit which can take the first casualties.
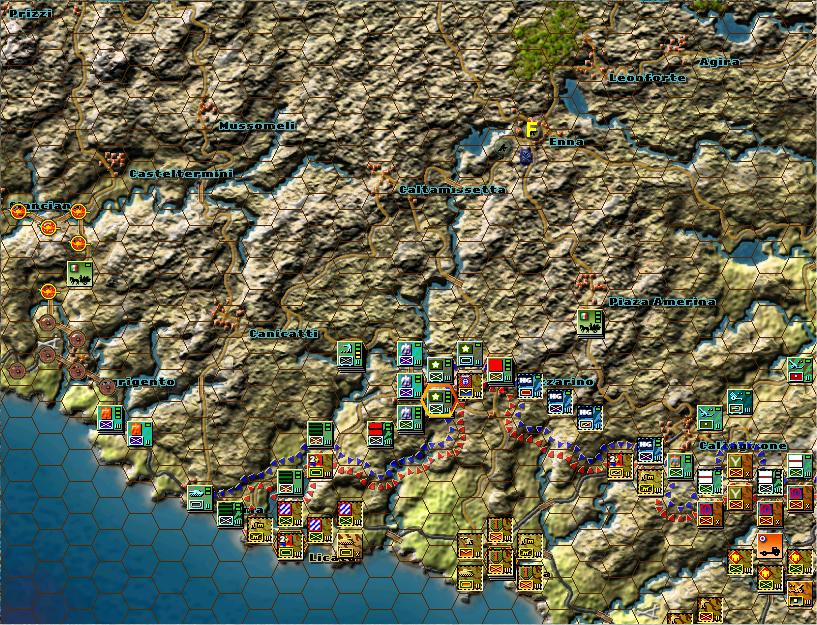
Note also the fortification of ENNA, marked by an ‘F’. ENNA is the shortest way to PALERMO, and possession of it will also allow the Allies to try and outflank your defenses in the East. There are other roads to PALERMO, so try to identify suitable chokepoints on these roads that can be fortified and defended.
Future Operations
The defense lines shown here are mostly bluff, in that even without breakthroughs, superior Allied numbers and firepower will wear them down. Your task in the early turns is to assemble your forces while punishing any over-extension by the Allies. In the middle game, you need to hold the British Commonwealth forces on the clear terrain in front of CATANIA while attacking and causing losses wherever possible. Doing this will inevitably mean that there are insufficient troops to hold back all the US attackers, so forces in the west will have to fall back and delay wherever possible once the US can organize a coherent offensive. One regular Italian division plus suitable sub-standard units must be preserved sufficiently so as to occupy the fortifications in PALERMO and cost the US forces further time in taking this important objective.
British Commonwealth naval forces get extended sealanes on Turn 19, so your eastern defenses must be ready to move beyond the new range of their guns by this time. The same will apply on the north coast with the US Navy getting their extension on Turn 20. Be aware of these limits when considering where to place fortifications.
Ultimately, you will be doing well if you can form a final line in a more or less rectangular shape with MESSINA and Mt Etna at the north-east and south-west corners, and lines running from the shoulders of Mt Etna to the east and north coasts. Some Etna hexes are impassable, and the rest are very good defensive, so make this the cornerstone of your final defense.