Version: 1.30 (March 2005)
Engine: Korsun Pocket
Turns: 16 or 24
AI or PBEM: Both
Author: Robjess
Download Gallipoli for KP
At 2am on Sunday April 25th 1915, Britsh Commonwealth forces came a shore at the Gallipoli peninsula in the Dardanelles. The plan was to knock Turkey out of the Great War and open vital sea lanes to Russia. Little did the Commonwealth forces know, but they had landed a mile too far to the north of the planned invasion positions and would have to fight through the worst terrain in the entire Gallipoli Peninsula.
This battle repesents the initial days of the Gallipoli invasion from 25th April to 2 May 1915. Commonwealth Britsh forces feature for first time that Australian and New Zealand forces (ANZACs) fought as nations.
Based upon the Gallipoli scenario published by SSG for their Battlefront engine (C64), the scale represents 250 metres per hex, and the intolerable terrain makes movement - particularly into enemy territory - almost impossible. This World War I battle uniquely features no mechanised units, Air support, interdiction and next to no Artillery.
Included in this Battle are the main historical Gallipoli landings, two scenarios each one with a stronger Turkish or Allied force for those that dont find the historical battle challenging, and two 'what if' scenarios. One based upon alternate landing sites which seek to split Allied and Turkish forces into 3 main battle groups, and the other scenario reflecting slightly stronger units and extended game play up to 24 turns!
This is a world war I battle. There are no tanks, there is no air support and there is limited artillery. The Rifle and the Bayonet were the weapon of choice - whilst these scenarios reflect the period after the inititial landings at Anzac Cove and prior to the development of detailed trench systems, the terrain is all up hill and was some of the worst terrain one would expect to have to fight in.
All of these things combined mean that its not easy to attack and even harder to advance and to exploit after combat. The area just off the landing zone was pretty much a mix of raised slopes, ridges and cliff faces. It was very hard going and extremely hard to advance into contested territory.
Because of the reliance upon basic Infantry units and less sophisticated weaponary - expect to attack at low odds! In addtion also expect to take casualties when you do attack.. there is a high chance that you will take losses as an attacker even when the odds are in your favour. To make matters worse, there are no step replacements in this scenario - losses are tied to timed step replacements - so if you are taking a beating - either through attack or defense, then you may need to think twice about rotating some units out of the front line and resting them.
There have been instances where I have attacked with single step units - come off second best and lost that unit!
Due to the nature of the terrain - you will be frustrated - especially as the Allies. Killing the enemy or atleast forcing a retreat out of that crucial objective hex doesnt necessarily mean that you will be able to advance into it! The costs of movement are very high, and units will be pinned down and unable to advance, especially if they are in contact. This is to reflect all of the gullies, and excellent defensive positions in the rocky outcrops. Advancing into contested terriroty is not easy - there could be sniper or a machine gun nest over the next ridge.
It was said that the Allies fought two enemies at Gallipoli, the Turks and the Terrain. I have tried to reflect this in these scenarios.
If your men get cut off and go into the red then it is more then likely that they will not be able to move at all - they are completely pinned down, they will either have to wait for the weather to clear, the enemy to retreat or they will need to be rescued.
Overall, beware of the terrain and use your ART wisely.
A little bit about the AI, as mentioned, due to the terrible terrain I found it hard - at times - to program the AI to do what I really wanted it to do - advance quickly as the Allies! This isnt a limitation with the AI or the KP engine, if anything, it was poor scenario design on my part, or maybe I was just expecting too much from my men :) Notwithstanding that, I have programmed a lot of AI for each of the scenarios - but I havent been able to test all of the AI routines for all scenarios - so if anyone sees anything a miss or a bit strange, then please let me know.
What you should know though is that in some scenarios there are up to 3 different AI's, when you start a game, it randomly selects one of those AI's to play the game as, this should add some variety, but given that the scenario is so small...
Historical Scenario:
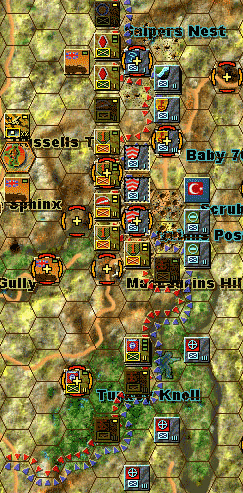
This is mean to reflect the historical landings at Gallipoli, the Turks get first move in this scenario, given that the Allies have already had a turn in landing on the beaches. Its going to be tough going for both sides, and in many cases the roll of the die will help to decide the eventual winner. Whilst most of the objectives are up the centre of the map from Anzac Cove - this is also the worst terrain!
As Allies - make the choice yourself.. if you can get some of the closer objectives early (Monash Gully, Sphinx, Russells Top, Snipers Nest) you will set yourself up for a win. You need to take Baby700, Battleship Hill or Scrubby Knoll for an overwhelming victory. Keep attacking, whilst it may not seem like it, the Turks will finally break.
As Turks - get your troops to the front as quick as you can. Use the terrain for defense, it is your friend. The allies need to advance up hill - thats going to be hard enough - you can make it harder by pointing guns at them! Whilst the terrain is your friend, it can also be your foe, keep out of the gullies and away from the clear. You decide if you should hold Monash Gully or not - any troops that hold it will surely be killed - once in the gully they will be unable to scramble back up the slope and ridges once they come under fire from the Allies. If you can keep a reserve. Dont be scared to counter attack.
Whilst this scenario be played against either side as the AI, its well suited as PBEM games.
More Means Stronger:
This variant is the same as the main historical battle, except that all unit strengths have been increased and this scenario goes for 24 turns instead of 16 turns. I created this scenario to see how the game would play out with stronger units... AI is there for either side, I would think that this one is well suited for PBEM.
Turkey's Relief:
This scenario has been designed to be played against Turkish AI. It provides Turkey with Reinforcements tied to Alert Points - the further East the Allies get, the more reinforcements the Turks will get - there are only 3 or 4 additional units, so it should still be possible for the Allies to win. Turkey also get some other added bonus'.. but you dont need to know about that. Give this one a shot if you are not find Turkey a formidable opponent in the other scenarios.
Night Time Assault:
This scenario variant is based upon the Allies making their landings under the cover of darkness - and with the Turks being somewhat less prepared then what they were. The Allies get to move first in this one, and they should have little problem securing a nice beach head and taking some key objectives early. The Allies also receive some other additional support from the Royal British Navy in the form of Battleship Barrages.. in additional there are some other tweaks which should make the Allied AI an bit more challenging.
This scenario is best played as the Turks against the Allied AI. As the turks, it will not be good enough to simply defend! Your orders are to expel the Commonwealth forces from the motherland - failure to do this will not secure you victory.
All Along the Water:
Realising at the last moment that the Allied landing craft are off course and several miles too far to the north - meaning that they now face intollerable terrain, the Allies introduce Plan B. They break their forces into 3 groups - and hastily plan to land 'all along the water'.
With the centre group continuing to what is now known as Anzac Cove. Groups North and South head for some easier terrain and attempt to encircle the aiting Turkish Forces.
This is a 'What if' scenario based upon alternate landing sites for the Allies. The Turks will be spread thin to cover all defensive positions - but so will the Allied forces...
AI exists for both Allies and Turks, I expect this may make an interesting PBEM battle also.
Installation:
Download and run the installation setup file, this should install all files and associated sub directories into a ..scenarios/gallipoli folder under your main Korsun Pocket Folder. Start Korsun Pocket up, and you should see the Gallipoli Battleset under the Korsun Pocket and Ardennes Offensive ones.
Good luck, I value any feedback - especially in relation to discrepancies, bugs or play balance. Note: that none of the divisional insignia's are accurate or historical.