Operation Crusader – The relief of Tobruk
Version: 1.02 (July 2007)
Engine: Battlefront
Turns: 24
AI or PBEM: PBEM Only
Author: Brubaker
Full 1.3 Install : Operation Crusader
1.01 Update Only : V1.1 Patch
1.02 Update Only : V1.2 Patch
1.03 Update Only : V1.3 Patch
By early November 1941 an uneasy stalemate had been reached in the western desert.
Over the course of the preceding year, the poorly led and ill-equipped Italian armies had suffered defeat after humiliating defeat at the hands of the Commonwealth Western Desert Force led by General Wavell. Only with the arrival at Tripoli in February of the newly created German Afrika Korps did the route stop. General Rommel, one of Hitler’s favored generals of the day, began his first campaign in early March, managing to push the Commonwealth troops back over the Egyptian border within 3 weeks! In the process the port city of Tobruk was besieged and the gritty 9th Australian Division, the first of many “Desert Rats”, dug in for what would become a siege that would not end for eight months.
Mid 1941 saw several mid-scale offensives launched by both sides, with the Allies trying to relieve Tobruk (Operation’s Brevity and Battleaxe) and Rommel trying to solidify his defence of the Libyan frontier (Operation Mid-Summer’s Night Dream). None of the battles achieved major success and both sides used the poor winter weather to train new troops and build up logistics for the heated battles that were sure to follow.
As October passed into November, Rommel was ready for a major assault to capture Tobruk. With the bulk of the effort being made by the “Afrika” Infantry Division, supported by a specially formed Heavy Artillery Brigade under General Böttcher and numerous Italian formations, the plan called for Tobruk to fall by mid November. The German drive would then continue and carry them right through to the Suez Canal and beyond. Ambitious plans indeed!
The 21st Panzer Division would remain in theatre reserve west of Bardia, with the 15th Panzer Division at Gambut earmarked for assisting the attack on Tobruk if needed. The best of the Italian Troops, the XX Mobile Corps with the Armoured Division Ariete and Motorised Division Trieste, remained in defensive flank positions south and south west of Tobruk. Their mission (as with the 21st Panzer) was to stop any British interference with the Tobruk attack. It is worth noting that many German and Italian Senior Commanders believed another British attack toward Tobruk was imminent. Their ideas were dismissed by Rommel who, after inflicting such heavy losses to the enemy in Brevity and Battleaxe, fervently believed the British no longer had the capability to interfere. This despite the obvious increase in British naval traffic over the course of the Summer and the logistical implications this brought. He couldn’t have been more wrong.
The new British Theatre Commander, General Claude Auchinleck, had the full support of Churchill and the British Government. Increased naval activity in the Mediterranean brought him hundreds of new tanks and guns. British sources quote the Eighth army under General Cunningham as having in excess of 700 tanks, 34,000 trucks, 600 field guns and 200 anti-tank guns by the start of November. This included at least 300 of the new MkVI cruiser tank, named “Crusader”, of which high expectations were held.
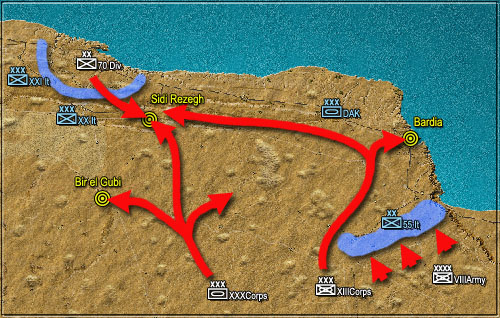
On November 18 in the midst of a torrential rainstorm, the British made their opening moves in what would be know as “Operation Crusader”. XXX Corps, spearheaded by a heavily augmented 7th Armoured Division, sliced across the desert toward Tobruk. Their initial task was to meet the German Panzers in open battle and defeat them, before continuing on to the besieged port. In the meantime XIII Corps would hook around the Italian positions on the frontier, capturing Bardia and meeting up with XXX Corps near Tobruk. It was a textbook British plan and one seemingly doomed nearly from the start.
The first of many tragic decisions made by the Allies happened early. The 7th Armoured Division, arriving at Gabr Saleh intact and sporting for a fight with the Germans, found themselves alone in the desert. Rommel has held sway at Panzerarmee Headquarters and forbidden the Panzer Divisions to move forward to what he believed was only a reconnaissance in force by the British. This may well have saved the German Panzers from complete destruction.
The 8th Army Commander General Cunningham, frustrated by the non-appearance of the German armour, decided to split the 7th Armoured Division into separate Brigades, each with its own individual task. Where the venerable Division may have caused immense damage to the Germans whilst intact, now became widely dispersed with few of its elements being in a position to support each other. Despite having superior numbers of (albeit inferior) tanks, the British Armoured brigades would again fight alone against the longer ranged weapons of the Afrika Korps. The initial results were somewhat inevitable
Game:
Operation Crusader is a 24 turn scenario for Battlefront that simulates the
see-sawing armoured battles in Libya in November 1941. The game begins on
November 18 and continues until the historical time that the Germans called
a general retreat to the Gazala line, defeated not by superior tactics but
moreso by a superior logistical system. Players on both sides can expect
interesting developments as both Axis and Allies gain tactical advantage at
different times. The scenario, as in reality, is weighted to give the
British more supplies and replacements over the longer term, though this
certainly doesn’t mean the result is inflexible.
As British Player, your forces begin the game as they were on November 18, that is to say, the 7th Armoured is divided into its individual Brigades around Gabr Saleh. Each Brigade has a specific task designed for it and the VL’s are organised to encourage this. You certainly have the opportunity to combine your division into a single powerful unit again if you so wish, but to do so will diminish your chance of capturing some designated VL’s within allotted time. Perhaps the destruction of the Afrika Korps is ample compensation for that…? The choice is yours.
The German Player will soon find that on average your individual units are superior in most ways to your opponent. But what you have in quality you lack in quantity. Any protracted combat will eventually wear these units down beyond a point of no return. At this stage you will be forced to abandon the field to the Allies. Think before you attack! In addition although some of the Italian units can hold their own in battle (eg. Ariete Armoured Division), many of the standard infantry divisions will simply fold in protracted combat. Make sure you do not leave them without German support for too long.
Changes from SSG design:
Although the scenario looks very similar to the SSG scenario Gazala, there are some individual peculiarities that should be noted before play.
Anti-tank guns: Most anti-tank gun companies in Operation Crusader are combat units, not support units as in the original SSG design. This has been changed for several reasons. As a combat unit the anti-tank company can now initiate and participate in combat instead of simply assisting in defence. It can also use direct fire against applicable units. Movement is quite restricted unless extended, whereby the company can move a distance similarly to motorised infantry and armour. The restricted basic movement means in general terms that an anti-tank unit can either fire or move in its turn, but not both. Players will find that most anti-tank companies can move at least one hex and fire each turn; the devastating 88mm Anti-Aircraft guns are very effective in this role…
Night Capable Units: The New Zealand Division present in the game was excellent at night marches and combat. Although the scenario does not specifically have night turns, the New Zealand Battalions have instead been given a quite dramatic improvement in Extended Movement as compared to other infantry units. This means when in supply they can quite literally move a dozen or more kilometres than other infantry. The New Zealand Supply unit is similarly advantaged to keep the troops in supplies!
Artillery: Most artillery in the scenario, like the anti-tank companies, can only move short distances without using Extended Movement. This means an artillery unit can generally choose to fire or to move long distances, but not both in a single turn. Heavy artillery is limited to only moving using Extended Movement so must be positioned the turn before use. It does have the benefit of longer range and greatly increased chance of scoring a KIA in combat. Siege weaponry indeed. Additionally it is valued more highly than regular artillery pieces and has a lower defensive value. It is designed for rear area use…
Special Attacks: When the 7th Armoured Brigade reached the airfield at Sidi Rezegh, this signalled the time for a battlegroup from Tobruk to fight its way out of the Tobruk perimeter and join up with the armoured advance, thus completing the severing of the German supply lines. The attack was both ferocious and unexpected and scored considerable initial success. Therefore, on Day 3 and Day 4, the Allies have at their disposal a couple of special attacks. These attacks will not cause many additional casualties, but will almost certainly force the enemy to retreat from the combat hex. Although designed for the Tobruk breakout, these attacks can actually be used in any combat on the designated days.
Direct Fire: The capability of anti-tank guns in Operation Crusader is similar to existing Decisive Battle and Battlefront scenarios except that because they are designed as combat units, many have a direct fire capability to utilise. The effectiveness of the direct fire is directly proportionate to the calibre of the weapon. ie. larger calibre guns such as 88mm or long 50mm have an increased chance of scoring a KIA in Direct Fire mode. This is an important differentiation between units and should be noted in battle. Tank units such as the PzKpf II and armoured cars generally only carry machine guns and hence do not have a direct fire capability at all.
Objectives: The objective icons have been altered a little to better display at a glance a player’s goals. They are either an axis or allied version of the following pictures. Generally speaking, if an objective is of golden colour it is of high value.
|
|
Major Objective: This objective is of high value compared to a regular objective and will form an important part of a winning player’s strategy. |

|
Timed Major Objective: This major objective is important in that it has specific timing attached to its VP’s that should be kept in mind during play. |
 |
Normal Objective: This objective is of some value to the player and will assist in the winning of the scenario. |

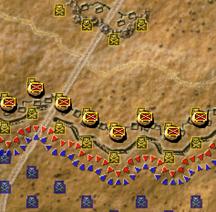
Terrain: In north eastern Libya, streams and rivers that impede movement are few and far between. Therefore, in Operation Crusader, they have been replaced by anti-tank trenches and wire, as viewed to the right. They act for all intents and purposes identically to rivers and streams in that they will impede movement of certain unit types. In addition a new terrain type called ‘gunpits’ adds a further strength to a defender and an equally difficult impediment for an attacker.
Overall Scenario Tactics: The map size that Operation Crusader takes place in is greater than previous armoured clashes to date such as the Gazala scenario. Therefore players will find that in general terms they simply do not have enough units to defend the ground they have to traverse, for any excessive length of time. More than ever it will be necessary for players to use their armour in its traditional North African role. That is to say, armoured regiments and brigades should be used as mobile battlegroups with flank attack capabilities; ships of the desert. Armour is least useful in static defence and any attempt to form a solid line of defenders using armoured units as you may once have done in larger scale games, will soon find you out manoeuvred, isolated and destroyed. Keep your armour moving, and when giving it a much needed rest and recuperation, move it back out of sight of the ever-lurking artillery guns and their eyes, the armoured car reconnaissance vehicles.
As British, don’t press the Italian Frontier positions too hard too quickly. Remember the Allied goal is to outflank the frontier and destroy it in isolation at a later time. Be wary of any combat against the German Panzer divisions unless you have superior numbers – the DAK battalions are nearly always better equipped and trained. Wear them down and if they do not retreat to rest, surround and destroy them.
As Axis, don’t commit too many troops to any possible assault on Tobruk. Any men and vehicles lost on the anvil of Tobruk will be hard to replace. Plan your counterattacks against the British offensive as short sharp actions. Any protracted combat will result in attritional losses to the panzers that you can ill afford. The garrisons at Halfaya Pass, Sollum, Sidi Omar will likely be surrounded before mid-game. You can choose to abandon them and retreat or to stick it out! Remember that a location may not be of great value to you but it may be to your enemy…
Installation: Download the self extracting EXE from the
link above. Double click on the Operation Crusader.exe and then follow the
installation prompts. This will install all files into a \scenarios\Crusader
folder within your main Battlefront Folder. The game may be selected by
choosing Operation Crusader from the normal game menu Good luck and have
fun!
Note: The installer assumes your game installation to be in the default Matrix folder. If this is not so you will need to guide the installer to the location you wish to install to. You may manually install the files if you wish by ensuring they are located within a folder named Crusader in your Battlefront Scenario folder.
Contact: If you require assistance with the installation, have a question about the scenario or just wish to make a comment, please feel free to contact me at brubaker@aanet.com.au with the word Crusader somewhere in the subject line.
Scott Wilson
Feb 2007