Version:
2.00 for Korsun Pocket (March 2005)
2.00 for Battles in Normandy (March 2005)
1.00 for Battles in Italy (August 2005)
Turns: 22
AI or PBEM: PBEM or AI
Author: JSS & Robjess
Download: Rommel - Master of
Battle for KP
Download: Rommel - Master of
Battle for BiN
Download: Rommel - Master
of Battle for Italy
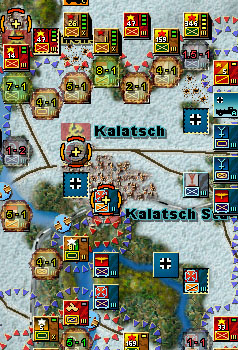
19 Nov 1942: Soviet armed forces launched an offensive that would end two and half years later with the complete destruction of the Third Reich. In this battle General Rokossovsky’s 5th Tank Army attacking South from its bridgehead at Kremenskaya attempts to link up with 51st Army attacking North from the Beketonskaya bridgehead. Linkup point is Kalatsch. At stake is the existence of the German Sixth Armee at Stalingrad. Capture of the bridges at Kalatsch will link the two Soviet armies, encircle Sixth Armee, and provide a ground line of communication (LOC... i.e. supply line) into the Stalingrad fight.
This battle is a historically based what if game. The battle considers what might have happened if FM Rommel had been appointed Fourth Panzer Armee commander in mid-Nov 42. With a fresh appreciation of the danger posed by the overextended position held by Sixth Armee, certain steps could have been taken in advance to mitigate the risk. If the Wehrmacht had the ability to maintain a ground LOC the entire battle for Stalingrad would have ended very differently.
All of the units depicted either took part in the greater Stalingrad battle or could have if timely orders were issued.
Design notes:
Here are the design notes for the Rommel scenario; these will give you some insight into the scenario and some tips for playing it.
1. This scenario is designed for PBEM. AI play is in place… it’s not designed to challenge, only to allow you to get a feel for the battle.
2. The scenario is by design different from most you’ve seen before as there are multiple paths to victory (for both sides!)... there is not likely to be contact between the two sides on turn 1. No perfect opening is possible as turn 2 and later success depends on how the two players’ strategies collide.
3. There are two dominate terrain features to this battle:
Open Steppe – nothing to hide behind here. A successful attack will result in the defender retreating. It also provides excellent mobility to mechanized forces. A unit that becomes surrounded has almost no chance of escape.
The Don River – runs mostly North-South and divides the battle into two regions. Only leg and motorized leg can cross without use of a bridge. There are six possible bridged crossing sites. If the Soviet player can take any of the four sites near Kalatsch, then linking the two Soviet armies can be accomplished easily.
Other features include:
Railroad – this serves as your best transportation route, unit movement, and supply delivery are least affected by bad weather.
Dirt road (major road) – this serves as excellent route for unit movement and supply delivery during good weather. These disappear when the deep snow (bad weather) hits.
Trail (minor road) – this also serves as preferred routes for unit movement and supply delivery during good weather. These trails are not readily visible to aerial reconnaissance (you can’t see them on the map!). When the deep snow hits this becomes identical to open steppe for movement.
Key supply features include:
Sixth Armee has five supply dumps. The two along the Eastern map edge draw from armee stock and any air delivers. These will run out before the scenario ends if a ground LOC is not maintained. The other three are local stocks and run out in 6-8 turns if a ground LOC is not maintained.
Soviet armies have three dumps (located at Prajov, Kalatsch, and Osinovska) that serve as forward supply areas when the Soviets control the areas later in the game. A third Soviet supply source in the North will become active around turn 10.
Army and front supply units do well to stay on the roads. The corps supply units for both sides often MUST go off road to supply the furthest units. Roads have an OP cost for tracing supply in this battle. Front and army/armee supply units will re-supply other supply units. They must have a trace to a supply source for this to happen (no supply source trace temporarily stops ability to re-supply other supply units).
New features for Battles in Normandy Rommel:
- Steppe, woods, heavy woods, village, and urban terrain all have a movement penalty for each side for moving into enemy territory. Most of these terrain types reduces exposure of enemy units (you must be closer to find/identify units).
- Units on both sides have equal exposure for all unit types. Support, artillery, and combat units become exposed at the same distances. Good air increases exposure; bad air decreases exposure.
- Soviets require 5 steps and dug in to avoid overrun. Germans require 4 steps and dug in to avoid overrun. Overruns can occur in all terrain types.
- German 359 Mil. Polizei Brigade and 619 Security Regiment reduce effects of Soviet partisan interdiction.
- All anti-air units reduce effectiveness of air interdiction.
- Several cities have static German Flak units which will reduce Soviet air interdiction effectiveness.
- Wehrmacht recce battalions and Soviet motorcycle units have greatly enhanced reconnaissance capabilities (+2 hex toward exposure). Horse cavalry units have enhanced reconnaissance capabilities (+1 hex toward exposure).
- Select artillery units can reduce strong points or place artillery interdiction.
- German player receives a limited number of minefields and strong points to place.
Installation:
Download and run the setup installation file and follow the prompts. Start Korsun Pocket/Battle in Normandy up and you should see the Rommel Battle under the Battles in Normandy/Korsun Pocket and Ardennes Offensive battles.
Errata:
This scenario/battle may be circulated freely in its current form as long as it is not changed or amended. Additional scenarios or variations based upon this battle are encouraged, so long as Rob Gjessing/JSS/Run5 are credited with the initial work.
If you do use this battle for any variants/scenarios - please be sure to send Run5 a copy also - so we can play it too :)
Good luck, I value any feedback - especially in relation to discrepancies, design flaws, or play balance.