Version: 1.00 (August 2005)
Engine: Battles in Italy
Turns: 30
AI or PBEM: PBEM Only
Author: Pete_au
Download Burma
Scale: 1 turn = 1 month
1 hex = 20 km side to side.
Turns 30 going from Dec 1942 to May 1945.
*******************
Design Notes
*******************
This game is a strategic model of the Burma campaign. Game play starts at the peak of Japanese expansion in the India / Burma Border.
This game can be won by either side in many ways.
There is a surrender option for the Japanese (loss of Rangoon, Meiktila, and Mandalay) and the Allies (loss of Imphal and Dimapur). The reason for this will be clear to players familiar with the Burma campaign, but basicly – the loss of Imphal and Dimapur will mean the allies have no staging cities for an invasion of Burma – essentially this front would have been lost and the defence of India in question. The key city for both the Japanese and Allies is Meiktila. The Japanese needed oil fields and rice paddies in the area to sustain the Burma front – but, they assumed the Allies would consider the capture of Rangoon and Mandaly more of a priority, simply being more prestigious targets.
The points option shows a myriad of potential targets. Every airfield is important, every hex of the Burma ‘road’ (a muddy track in many locations) is vital, every city gives an anchor to the troops. The airfields in the Burma plain, once captured by the allies, allow air power to be used closer to the Japanese front and to more and yet more devastating effect.
Supply is critical in this game. At the start of the campaign the allies are restricted mainly to road supply, the Japanese are using the local wildlife to good effect. As the game progresses an improvement in allied tactics sees an improvement in supply. Also, the capture of airfields creates air ‘heads’ from which allied units can be supplied.
It was said (and its true) that the Japanese could go for 4 months without supplies from the column, living off the land. Thus, all Japanese troops have 4 bullets. The allies had to deal with English, Indian, Chinese, African & Burmese diets and poor field training to begin with – they are limited to 2 bullets (except the chindits).
General Slim has a major effect in the game. His arrival heralds the
improvement in tactics, moral and training of the allied armies.
Once the Chindits arrive the Japanese player will need to carefully patrol
his supply lines and garrison any location he feels is important.
The chindits arrive at secretly selected locations (chindit fortresses) on the map (choose them carefully or the Japanese player will find them and prevent their arrival). Chindits are too powerful to be represented by sabotage placements and so are actual counters. They aren’t too strong but can take out support units and capture airfields. In reality, as I’ve explained, the Japanese shouldn’t be too fussed about the disruption to supplies as the troops carry enough to keep fighting for a long time with out being able to trace a line.
The allied player has control of the Yunnan Chinese armies too. They are poorly armed and often politically motivated (sometimes they obeyed orders form the allied HQ – sometimes they did nothing or just defended when they could have attacked). You are doing well and historically with them if they can keep the Burma road open and link with the main alled body. They have a seeming limitless supply of reinforcements.
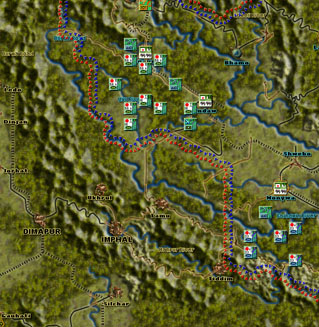
Terrain. Pay attention to major rivers. They can only be crossed at bridges – each side has units capable of bridging. The major rivers were a mile or so wide. In reality the allies only crossed the Irawaddy in 1945 – it was the largest opposed river crossing in WW2. You will notice some roads go right up to the river and stop (no bridge). This is the way it was. Putting bridging units here to create supply lines is a good idea.
Japanese HQ represent Army level assets.
Most artillery is represented at the unit level , being mainly mortars
and such. Mountain artillery units are represented by counters. You will
see how the allies loose AT capability after 7 months (the Japs had no
tanks to speak of) so they didn’t need it. Speaking of tanks. Tanks
won the war for the allies. The Japanese had NO useful tactics to deal
with them. So, even though they were only Stuarts, Shermans and Grants
they had a significant effect on Japanese troops – especially on
the clear burma plains (tank country).
Both sides get a small degree of amphib activity to start. However, the
allies can make some major assaults later in the game – both sides
need to be prepared. Rangoon was lost by amphib assault.
I have attempted to get all the actual divisional icons correct. The
British 70th division was never formed but provided troops for Chindit
operations so has a made up icon. Japanese divisional flags looked like
they do in the game – red disc on white with text added by the soldiers.
I have used Kanji to write the division numbers to simulate this and differentiate
the units. The 11th East African Division did not see combat – but
you can make them fight if you want. The war was won before they made
it to the front line.
*****************************
Installation:
*****************************
Download the self extracting EXE from the Run5 Scenario area. Double click on the installer and it should properly identify your Battles in Italy folder and correctly install the scenario into the ...battles in Italy\scenarios\Burma Campaign folder.