In this tutorial we look at AI. It is important that before you commence this tutorial that you have read through the other Scenario Editor Tutorials to date.
In the last Tutorial, number 7 - Units, you were set some homework and asked to create a dozen or so units for each of the United States and the Germans. If you followed the tutorial correctly, you should have also assigned AI Groups to these units based upon their location on the map and ensuring that you placed all units that you want to operate as a group in the same AI group. Remember also, that units from different OOB's can be part of the same AI grouping.
In this tutorial we will look at how program the AI instructions to each of the AI groups through different phases of the battle. We will also see how you can create several AI's for the same scenario - one of which will be randomly selected for each side when the game commences! Because we are going to be ordering units around the map - it is therefore vital that you have done your homework from Tutorial number 7.
For those of you who have not done your homework - of those of you who have a dog that ate it! Dont fear! As a time saver you can download my version of the Luxmberg scenario in preparation for this tutorial.
Download Rob's Luxemburg_tutorial8.exe data.
|
Installation Instructions: Click on the link above to download the file. When downloaded, double click on the file to run the self extrating exe. The scenario must be installed into your a luxemburg folder under your main ...korsun pocket\scenarios\tao folder. The Luxemburg folder will be created automatically, so all you need to do is broswe to your ..korsun pocket\scenarios\tao folder and then click on Unzip. Note that this will overright any files which you may already have in your Luxemburg folder if you have been creating the scenario as you follow the tutorials! |
Here is a summary of my unit information for my Luxemburg scenario - if you have done your own thats fine, they dont need to be the same, so long as you have followed a similar logical approach as I have - in other words you have assigned units into AI groups and you have a some sort of an idea what you want each of the AI groups to do!
Allies: I have 2 AI groups. The first AI group is what I will refer to the Ad Hoc Units. These are all of the units that start on the battlefield for the Allies. Their main role is to delay the Germans and to defend Luxemburg and associated towns until the reinforcements arrive. AI Group 2 are the reinforcements. From memory they consist of 2 different ARM divisions, 2nd and 5th Arm I think. They arrive from turns 5 or 6 through to turn 9. Their role is to save Luxemburg and attack the German forces. I have therefore assigned all units that start on the map to the defense of Luxemburg in AI Group 1 - it doesnt really matter what OOB or what Armies they are from, they all have a common function. I have also assigned all Reinforcements to AI Group 2 which is the cavalry - the Armour. They too have a common function and goal and thats the relief of Ad Hoc units.
You do not have to use the same approach, you may have 3 AI groups, you may have decided to defend Luxemburg and Ettelbruk (depending on the Victory Points you have assigned to the objectives) and you may also have an attack force. It is up to you, so long as you understand that the units assigned to an AI group will all have a common goal and will all function and operate together as a force.
For the Germans, I have assigned 3 AI groups. I have divided the units into AI Group 1's through to 3, assigning them as Attack groups North, Centre and South. So this means I intend there to be 3 main arms to my German attack. They may all end up with the same end goal - that being Luxemburg, just taking different approaches to get there, and being assigned different minor objectives along the way. Or alternatively, I may decided that only one of the AI Groups will attack Luxemburg, the other 2 I may assign to different tasks - one defending the Northern flank and one trying to pocket and screen isolated units.
What you choose to do with your units and AI groups is entirely up to you - this tutorial will show you how to do it.
As a rule you should get into the habit of saving the Map Data before you program any AI. Infact you should save the map data each time you play around with the Objectives - but as a safety check, always save it again before you do the AI. To save the Map data, select Edit the Map and then Click on Save Map Data. Now return to the Goto Main Menu.
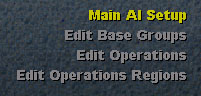
Lets get into the AI! Click on Virtual AI to go to the AI menu.
Now click on Main AI Setup - as shown above. This will take you into the main AI setup screen - of course.

It is from here that we create the Main AI Operations. Before looking specifically at these settings, lets discussion how the AI works.
Up to 9 AI routines or Operations can be created for each side for each scenario. When a game is commenced, then the engine will randomly select one of the available AI Operations for each side. The entire game will then be based upon that AI Operation. So in theory, you could create 9 completely different AI operations for each game, each of them slighly different from the next. Or they could be completely different. For example, AI Operation 1 for the Axis may have the Axis attacking in the northen sector, AI Operation 2 for the Axis could have them attacking in the South and AI Operation 3 could have them attacking all along the front. Each time a game is played, the computer will randomly select which one of these AI operations it will base the games AI on.
Further to this, each AI Operation is broken down into Phases. Each Phase represents a range of turns. So for example, Operation 1 for the Axis may represent 4 Phases. Phase 1 from turns 1 to 4 could represent massive attacks from AI Group 1 in sector X, Phase 2 which represents turns 5 to 10 could see attacks from AI Group 2 in sector Y, on the presumption that the enemy moved many of its units from sector Y to sector X in response to the Phase 1 attack. And Phase 3 could see both AI Groups attacking between turns 11 to 16. Phase 4 may see all AI Groups defending in response to expected enemy reinforcements.
So as you can see, each AI operation allows you to specifically define a range of turns as Phases. It is in these Phases that you will give your orders to your AI Groups.
Thats how the AI in Korsun Pocket works! Understanding the theory is half of the job in programing the AI.
Throughout this tutorial I will make reference to AI scripting. The AI scripting is a special type of AI programing that is used by the engine to mimic the exact execuation of units as played out by the scenario designer in a PBEM game against themself. To program AI scripts, you need access to a special scripting.exe - at the present time this file is not available, but we are currently discussing with SSG for the file to be made available on the Run5 website.
Right so thats the theory out of the way, lets have a look at the Main AI screen in more detail.
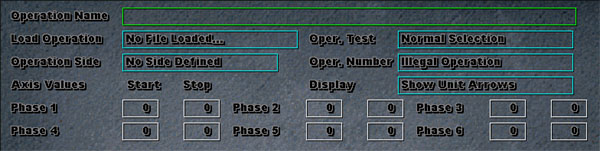
Operation Name : This is the name which you will give to your AI operation. Generally you would name your operations, Axis Number 1 and Allied Number 1. If you choose to write alternate AI operations, you would name them Axis Number 2, Axis Number 3 etc.
Load Operation : Once you have created and saved an AI Operation you can then load it should you want to amend or change it. See Load below.
Oper. Test : Allows you to specify if this operation is Normal Selection (randomly selected from all other available operations if there is more then 1 when the game starts), or Testing Operation (which means that the engine will always select this operation when a game starts so that you can test it). This setting should always be Normal Selection, unless you have more then 1 AI operation and you always want this one to be selected when a game starts for testing purposes.
Operation Side : Which side does this AI operation apply to - Axis or Allies. When you select a side you will notice that it loads all of the units, grouped in AI Grouping in the bottom half of the screen. You will also note that the AI Groups are listed in the right hand panel.
Oper. Number : This setting lets you assign an operation number to this AI Operation. In practise, Select Number 1 and then work your way through numbers 2 to 9 as you add new AI operations. It is quite possible that you may only want to program one AI operation for the game. This is fine.
Note on the next line down there is a field that says Axis Values - this is misleading and should be ignored.
Display : Allows you to determine if you want the units displayed by arrows on the map so that you can see where each unit is as you program the AI. I recommend setting this to "Show Unit Arrows" as its quite a handy feature.
The next group of boxes allow you to specify the start and end turns of each phase of your AI operation. It is simply a case of entering the turn numbers in the boxes for each Phase. Note that whilst you can have up to 6 phases in the battle, whether you use them all is entirely up to you. You may decide you only want 2 or 3 phases, or even 1 depending upon the length and dynamics of the scenario.
Then click on Save to save your Operation.
To Load an existing operation, select the operation in Load Operation, and then click on the Load AI Button.
Ok now lets go ahead and create out first AI Operation!
If you have downloaded my Luxemburg scenario, enter the following settings, otherwise you can create your own which is unique to your game.
In the Operation Name, enter Axis Number 1, select Axis as the Operation Side, select Number 1 as the Oper. Number setting and then enter your turn Phases as follows; Phase 1 = 1 to 6, Phase 2 = 7 to 12, so that we are splitting the scenario into two distinct phases.
Your screen should look similar to this one below:
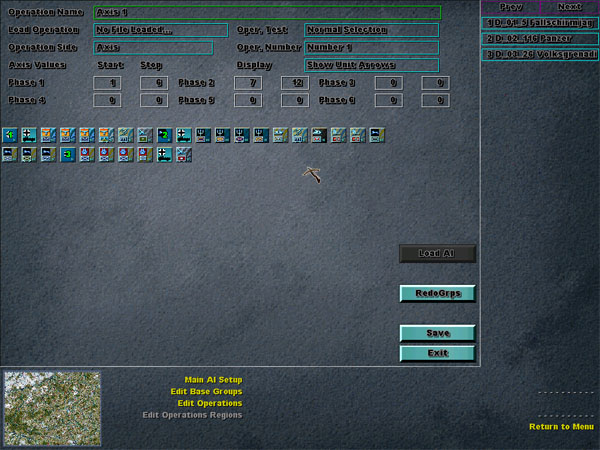
Ensure you click on Save, and then select the Edit Base Groups link from the bottom panel.
Edit base groups simply allows you to cycle through and name each of your AI Groups. Im not going to provide a screen shot as its pretty simple, just rename each of your AI Groups to something which is meaningful. Like North Attack, Southern Flank, Strong ARM, or whatever you please.
If you have downloaded my scenario, rename the first group to North, the second group to Centre and the third group to South.
Ensure you click on Save, and then select the Edit Operations link from the bottom panel.
Edit Operations is where you create whats referred to as specific AI Cards for each AI group and each Phase of the AI operation. Sounds confusing but its not, lets look at it as a hierarchy..
AI Operation:
We start was an AI Operation. The AI Operation holds the AI for each side, we
tell the AI operation which side it relates to and how many phases there are
in the battle. You can have more then one AI operation if you want to, but you
dont need to. Think of the AI Operation as the actual AI for each side, therefore
there needs to be atleast one AI operation for each side! If there are more
then one AI operation then when the game starts the engine will randomly select
which AI operation it will use to base the AI on.
Phase:
There are a number of phases defined in an AI Operation. Phases are based upon
a range of turns. There must be atleast one phase, and no more then 6 phases.
AI Groups:
Each unit is assigned to an AI group. It is the AI groups that we will give
instructions to for each phase of the battle, its these instructions that are
referred to as AI Cards.
So therefore, each AI Operation has 1 AI Card for each Phase and each AI Group. So if you have 2 Phases and 3 AI Groups then you need to create and program 6 (2x3) AI cards. Another way to look at it is, we need to be able to instruct what each AI Group will do in each phase of the battle. So, 1 card for each AI group for each phase equals 6 cards in total.
Imagine how many cards there are for something like the TAO or KP campaign! The more units you have, the greater the number of AI groups there are, the more turns you have then the greater the number of phases you probably have. This can result in a lot of AI cards to program! Lucky for us, we will keep things small and simple for this tutorial.
Ok that all cleared and up and understood - lets look specifically at the AI Operation (card) Screen.
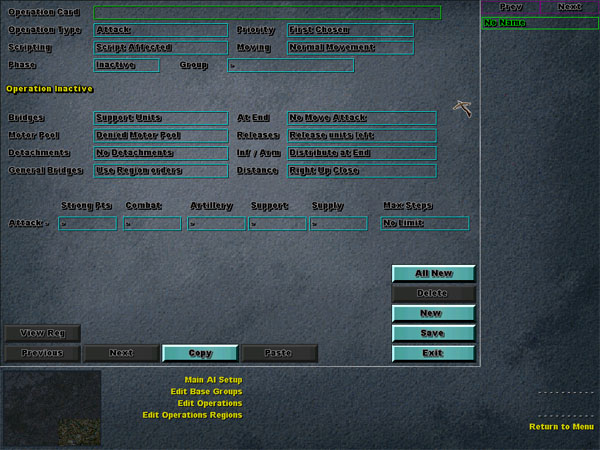
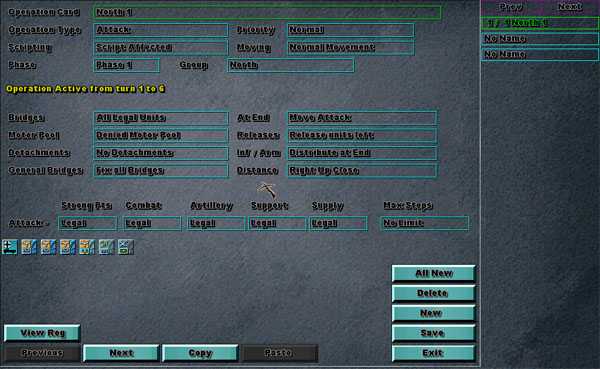
Operation Card : This is the name which you give to the operation, normally I name the operation by the Group and the Phase, so for example, North 1, means Northern Group Phase 1. North 2 means Northern Group Phase 2 etc. If you press the ALL NEW button, then it will create all of the Operation Cards in the right hand panel that you need to complete and name them all for you. All you need to do then is move from each card in the right hand panel and set them all - as we will detail below.
Operation Type : This tells the AI what it should be doing for this operation, either Attack or Defend. The Global Attack setting does not work so you can ignore that one.
Priority : Tells the AI what priority it should give to units using this AI Card. Valid settings are, First Chosen, Normal, Last Chosen or Ignore. When the AI processes Operation Cards, it will work through them in order of priority that you have set them here. One of the uses of this setting is you may provide an AI Group the role of attacking and clearing strong points before the second AI Group comes through and attacks the actual units in that hex. In this instance you would give the first AI Group a priority of First Chosen, and the second group a priority of Last Chosen.
Scripting : This setting tells the AI if there is any scripting associated with this Operational Card. Generally you should leave this setting to Scripting Affected.
Moving : Valid settings are Normal Move or Agressive Move. I dont think Agressive Move does anything though, so it is recommended leaving this set to Normal Move.
Phase : Allows you to assign a Phase to this Operation Card. This is usually the second setting I make. You AI will not work unless you select a valid Phase. When you select a Phase, the turns that the phase relate to is written in yellow just below this setting. If you do not select a Phase, you will notice that it says Operation Inactive in yellow.
Group : This is where you select the AI Group that this Operation Card applies to. This is usually the first setting I make. When you select an AI Group the units in that group will be displayed at the bottom of the screen. You must assign an AI Group to make this Operation Card active.
Now moving onto the bottom half of the screen, we will give some specific instructions to the selected AI Group for this Phase. Now remember that these instructions only effect the units in this AI Group for the turns specified in the phase that this Operation Card relates to.
Bridges : This allows you to define what sort of units (in this AI Group) can blow bridges during this phase. Either, all valid units or support units only.
At End : Specifies what the units in this Group for this Phase can do after the end of any script has run. Valid settings are: Move Attack, No Move Attack, Move if no Script, No Attack Allowed. They should all be pretty self explanatory.
Motor Pool : Allows you to specifiy if the Motor Pool can be accessed by the units using this card.
Releases : Allows you to specify if the units who have detachments deployed are able to call them up.
Detachments : Allows you to specify if units are able to deploy detachments.
Inf / Arm : Allows you to specify if units are able to take replacements steps, and if so, when, either at the start of the turn or at the end of the turn. You may specify that an AI Group in this Phase should take replacements at the end of the turn because you dont want them to waste an attack opportunity by taking a replacement. Alternatively, you may specify that units using this card should take their replacements at the start of the turn, as you want them to defend and survive more then you want them to attack. You can also specify that units are unable to take replacements when using this card.
General Bridges : Allows you to set a 'fix all bridges' order to units using this card, or allows you to defer this setting to the Regional Settings - which we will look at a bit later.
Distance : This is a neat setting! The valid settings are Right Up Close or Distance from 1 hex all the way through to 8 hexes. What this does it is tells the AI to keep, to the best of its ability, all units using the card x many hexes away from the enemy. Right up Close means just that, get as close as you can, this is the default setting for attack and defense. A setting of 3 hexes though means that the units will try and keep at least 3 hexes away from the enemy at all times. This is handy if you want to order a general retreat and fall back to the units using this card. It doesnt mean that the units will run alway the back to the other side of the map, it means they will retreat in line with the enemys advance!
The final line on this screen relates to the valid Attack settings, for each of the following, you are able to set Legal or - (meaning illegal) attack orders against - Strong Points, Combat, Artillery, Support, or Supply. With this setting you can effectively order the units using this card to only attack Supply, support and Artillery units. Or alternatively you can tell these units not to waste time attacking strongpoints.
In addition to this, you can also restrict any of these attacks to 1, 2, 3 or No Limit step units through the Max Steps setting.
Thats about a wrap for Operational Cards! If you have downloaded and are using my Luxemburg scenario, then make the following settings for this card:
Operation Card name should be North1, select the North Group and choose Phase 1. Make the operation type Attack, with Normal Movement, General Bridges should be set to Fix All Bridges and leave the script setting as Script Affected. Make the at end setiting Move Attack, with No Detachments, and the distance should be Right up Close - because we want to attack! Make all attack type from strongpoints through to supply Legal, and make the Max Steps no Limit. Any of the other settings dont really matter. Your screen should look similar to this one:
Thats it! Well for Operational Cards anyway. But that in itself defines the makings of your AI for an AI Group for a specific Phase of the battle. There is one other thing we need to set though - we need to define the Regions (or objectives) that this AI Group should operate in for this phase. Whilst you will need to set the Operation Cards for the rest of the Phases relating to this AI Group and all other AI Groups, for the time being, lets save our data here and move onto Edit Operations Regions. You can come back and complete the rest later.
The Edit Operation Regions is where we select the valid regions, as defined by the Objectives, that AI groups can operate in for specific phases. We do this by assigning regions to Operation Cards. Click on Edit Operation Regions and then select the first Operation Card in the right hand panel, as shown below:
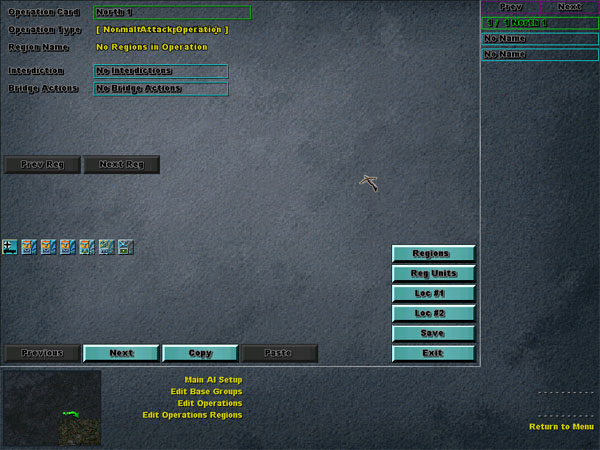
First off lets have a quick look at what buttons are available on this screen.
Regions : This button takes you to the map, where you can select the regions which are valid for this Operation Card.
Reg Units : This does the same as the Regions button, except it also shows the units on the map.
Loc #1 : This function does not work - so dont worry about it.
Loc #2 : This function does not work - so dont worry about it.
Save : Saves your data.
Exit : Exits you from this function.
Before we can examine some of the other settings though, lets get down to business and do what we are really here for, and thats to assign some regions to this Operation Card! This really is quite easy to do, so long as you follow some simple rules! The rules are this; when you select regions, the order that you select them in is very important. As you select regions, you are assigning these regions to this Operation Card that you have selected in the right hand panel - by virtue of that you are assigning regions - or objectives - you all units in an AI Group for a phase - or range of turns. These units will to their best to secure all of the objectives in relation to these regions, working through them in the order that they are selected. The units will always try to make their way to the last region that you select. This is why it is important that you select them in the order that you want the units to move through them.
In other words, the first region you select, will be the first region the units will attempt to secure, they will then move onto the next region that you selected and so on, view a view of them trying to end up in the the final region that you selected. Got it? Simple right! Well lets do it!
Make sure you have the appropriate Operation Card selected in the right hand panel, and now click on the Reg Units button to access the map. Now, simply toggle the regions you want this AI Group to operate in for these specific turns. Remember the rules above! To assist you, Pressing the "R" Key will toggle the region numbers on and off the map. When you are done right click and then click on the save button.
Note that the top right hand corner of the map does not have any Region assigned to it and therefore can not be selected, or toggled on and off.
For those using my Luxemburg scenario, select the following regions in the following order; 10, 8, 3, 11, 0, 4, 6, 16, 9. What we just did was mapped out the regions that we want our Northern Attack force to operate in for Phase 1 - the first 6 turns.
You should notice now that we have selected some regions, that the Next Reg. and Prev Reg. Buttons near the top of the screen are now active. These buttons allow you to scroll between each of the regions that we selected. There are two settings above these buttons which can be used to apply to each of the individual regions that we just selected, they are :
Interdiction : You can use this setting to specify if the AI should place Interdiction in the selected region during these phases. Generally it is recommended to leave this at its default setting of No Interdictions for each of the regions. The engine generally makes close to perfect decisions when it comes to interdiction as it is, and there is no real need to override this.
Bridge Actions : Allows you to specify if bridges should be repaired or blown for a specific region.
Remember that these two settings are specific to individual regions, unlike the similar settings for the Operation Card which applies to all regions selected as a whole.
Thats it! You have just mastered the programming of AI! It doesnt end there.. you will now need to go off and finishing creating and programing the rest of the Operation Cards for all AI Groups and Phases for both the Axis and the Allies.
Those using my Luxemburg scenario to follow this tutorial can apply the following settings for the remaining Axis Operation Cards.
Select Edit Operations, select the North 1 card in the right hand panel, click on the Copy Button, click on the New Button to create a new blank operation card, select this new card in the right hand panel and then click on the Paste button near the bottom. What you have just done, should be pretty clear, you have copied the North 1 card into a new blank card. Rename this new Operation Card to North 2 and change the Phase to Phase 2. You should notice the active turns for this operation are now turns 7 to 12. Also make sure that the Group is still set to North. Save the data and then click on the Edit Operation Regions.
Making sure you have the North 2 card selected, click on the Reg. Units button to access the map. Because this card has been copied from and based on the North 1 card, some of these regions will still be valid for the North AI Group. Lets toggle the following regions off, 8, 11, 3 and 0 - so that they are no longer active (we dont want our units hanging around these regions by turn 7 - I think anyway! The battle may prove this otherwise though and we may need to revisit this decision). And toggle the following regions on, 9 and 2 (in that order because we want Luxemburg captured before they move onto region 2. Save your data! You have no programmed the complete AI for AI Group 1 (North!).
Now go back to Edit Operations, Click on New to create a new blank card, Select the North 1 card, copy it paste it into the new blank card. Change the Group to Centre, make sure the phase is Phase 1 and then name the card Centre 1. Click on Edit Operation Regions make sure you have the Centre 1 card selected, and then toggle all regions off, and make the following regions active : 11, 12, 6, 15 and 9. Save your data.
Go back to Edit Operations, create a new blank card, copy Centre 1 into it, change the phase to Phase 2 and rename it to Centre 2. Go to Edit Operation Regions and toggle regions 11 and 12 off. There is no need to add anymore.
Now onto the southern group, you should be able to work this one out yourself, by following the steps you followed for the Centre Group. You pick what regions you want them to operate in. Take special care to ensure that the Group is set to South and that you have the phases set correctly! Good luck!
You are now on your own. Make sure you have saved all of your data, and you can start up a game to test this AI we have just created. Exit from the editor, start Korsun Pocket and select the Luxemburg scenario under The Ardennes Offensive. Make sure you select Germans as Computer and see how it goes! If the units arent doing what you need them to do, then come back and refine the AI... infact I can assure you that you will need to come back and refine it. You may need to change all of the German AI Phase 2 cards to defend if the allies are too strong. Or you may choose to refine what regions are active for each card.
Once you have done that.. create some AI for the Allies and then set back and watch the computer play as both sides - its a special kind of feeling watching a game play out based upon your orders!
Dont forget that once you are happy with each sides AI, you can then go and create another AI instruction set! Just call these ones Axis 2 and Allied 2 and make them slightly different. For example make 3 phases and select different regions this time.
If you need additional support in relation to this and other Scenario Editor Tutorials, visit the Run 5 Discussion forum and post a message in the Scenario Editor Forum.
Disclaimer: I take all and no responsibility for how this AI performs on the battlefield! I made this AI on the fly as I was writing this tutorial, the AI stands as a testimony on how to write an AI. Nowhere did I say that we were going to write a quality AI to knock your socks off! You will probably notice some flaws with this AI - thats good.. no go forth and correct it!