How are Strongpoints different to those in TAO2? And what the heck is a fortification?
In a comment on the previous turn, Ken asked "As far as detachments go, they are the soldier silohette in the hex and the kneeling soldier in a cirle is a strongpoint, is that correct. Strongpoints act as they did in the first game? Do detachments have to be attacked like strongpoints to clear or do they disappear after enemny occupation for a turn or so?"
The answer to this question is such a good topic that it deserves its own article so, here it is - strongpoints and fortifications explained...
(Chris and/or others please feel free to add comments).
DETACHMENTS
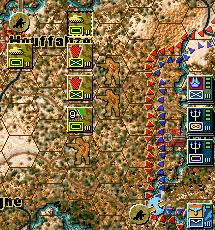
Detachments are the soldier silhouettes in the hex. They can be difficult to see on these screenshots, as we have to compress the maps down (jpeg) to keep the file sizes small. But if you look at the map below you should be able to see two of these detachments just in front of the Allied line.
The manual to Korsun Pocket explains detachments as:
"Some units can drop off detachments by expending a bullet. Detachments are not combat units... They increase the movement penalties in the hex they occupy, slowing down the enemy. Attacks from a hex containing an enemy detachment do not earn a tactical shift.
Detachments cannot be attacked. If a detachment-capable unit is destroyed (except at very high odds) then it will leave a detachment behind. All detachments are removed one turn after they were created, regardless of enemy activity."
There are two main purposes of detachments: firstly to slow the movement of units passing through the hex; and secondly to disrupt combat initiating from that hex (by negating the combat shift that would have arisen from a normal hex).
STRONGPOINTS
Strongpoints, on the other hand, act as they did in TAO2 but with some variations. Strongpoints, as we used to know them, are now actually two different things: strongpoints and fortifications.
I must admit that I have previously referred to both of these things as strongpoints, so I will use this as an opportunity to clarify it. Strongpoints are the BLACK, half-kneeling soldiers that Ken referred to. Fortifications are the RED, half-kneeling soldiers. But while they look similar, (one is the black soldier and the other the red), they behave slightly different.
Using the same map from above, you can see a strongpoint in the upper left hand corner in the town of Houffalize, and one at the bottom of the map where the bridge has been blown.
Strongpoints must be attacked to be removed. Any attack directed against a strongpoint will only damage the strongpoint -- not the units stacked with it. The stacked units will stay untouched until the strongpoint is destroyed. However, while defending units don't suffer any losses, they do contribute to the overall defence value of the hex.
Say we have a 1-step strongpoint in a hex with some Allied ARM stacked on it. It's attacked by Germans and the result is a 0-2R. The strongpoint will lose one step, but no other damage will occur to the ARM units. Of course, any further attacks to it will result in losses to the ARM as the strongpoint has now been destroyed.
FORTIFICATIONS
Fortifications (the RED ones) are slightly different to strongpoints. They work in the same way, except fortifications are released by units.
The map below shows the area to the extreme south east of the theatre.
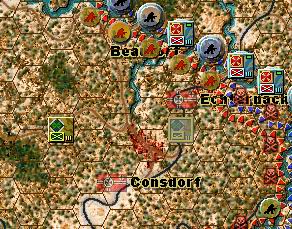
Here, you can see that there are five Allied fortifications running SE along the river. Also note there is a strongpoint in the extreme SE, showing the difference between strongpoints and fortifications.
So what is a fortification? Certain units (not all of them!) can choose to become static and deploy fortifications. The units that have 'deployed fortifications' are represented on the map as opaque.
Looking at the map above you can see that these fortifications have been created by the opaque Allied unit on the road just NE of Consdorf.
Lets look at this in more detail by selecting the unit responsible for these fortifications - the 12th INF.
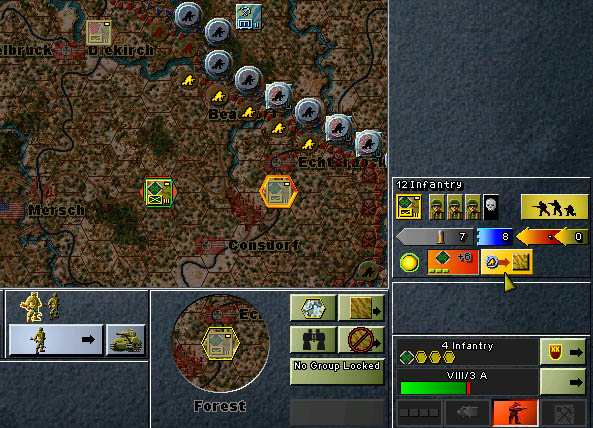
Selecting the unit also places 'gold soldier highlights' on all fortifications that that unit is responsible for. As a side note, you may also note that the unit to the west of the 12th INF is also slightly highlighted. This is because it is from the same DIV as the 12th INF. In Korsun Pocket, it will show you all other units from the same division as the unit you have selected -- a neat feature for coordinating your attacks and ensuring you do your best to get the divisional integrity bonus. But that's another story...
Back to fortifications. Once a unit deploys fortifications, that unit can no longer move or attack as a normal unit while the fortifications remain deployed. The unit can elect to 'recall' those fortifications though (by clicking on the 'release unit' button as highlighted on the map), which will in turn enable it to move and attack as normal again.
A common question is what happens to the unit if the fortifications get attacked and they are all destroyed? Is the unit killed as well? The answer is no, the unit has not taken any losses and it can still be called upon to act as a normal unit. Think of it as the 'fortifications' being destroyed, not the men.
Edited and Revised by Dave aka Funkwagen.