This is a collection of comments I have made concerning some of the new features in the latest incarnation in the DBWWII series, mainly taken from myself and Rob's first published AAR.
This is by no means a comprehensive list of new features; in fact this barely scratches the surface!
Onscreen information
Playing KP over the last few weeks I now find decision making a lot easier in some ways than TAO. Virtually all rules are represented in one form or another on screen, which is great when deciding how to attack a unit or working out supply lines, for example.
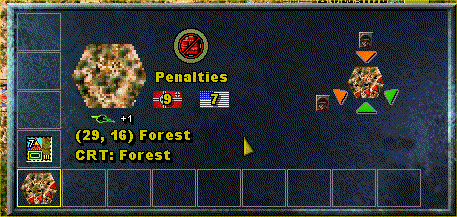
If I right click on an enemy hex it reveals useful information as per the below pic:
I can tell at a glance that I need to position my attacking units in the hexes marked with the green arrrows; this will give me a full shift bonus for combat. The orange arrows with the step graphic indicates that I will only get a positive combat odds shift if the number of attacking steps is greater than the number of adjacent enemy steps (excluding the target hex). This is why continuous line defences can be difficult to crack.
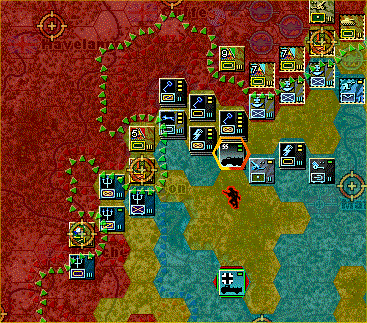
Other items displayed in the information box can include mines, strongpoints, roads and rivers in relation to the selected hex etc. Another useful feature is the Show Supply Gradient button:
As per the manual:
"Show Truck Supply shades every hex on the map green, blue, yellow or red.
These shadings indicate what level of supply a supply truck on that hex will
receive in the next turn. Green hexes are on roads which run directly to a supply
head (the oil drum symbols on the side of the map). Trucks on these hexes usually
receive a supply bonus. Blue hexes are close to supply roads and trucks on these
hexes receive normal supply. Yellow hexes are far from supply roads and trucks
on these hexes receive restricted supply. Red hexes are unable to trace a path
of a reasonable distance to a supply head and trucks on these hexes receive
no supply."
The little green arrow line is the expected supply broadcast for the supply truck highlighted, for the next turn.
So it's now much easier to visualise your supply situation and hence make more informed decisions about where to move for the next turn. Of course, your opponent could spoil your perfect supply plan by moving or placing interdiction....
Victory Point, Replacement and Alert Points system
Ok, now it's time for the latest Cool New Feature. It's the victory point, replacement and alert points system I want to look at tonight. Let's take the example of Bastogne in our game. By right clicking on Bastogne and selecting the German flag we get the following:
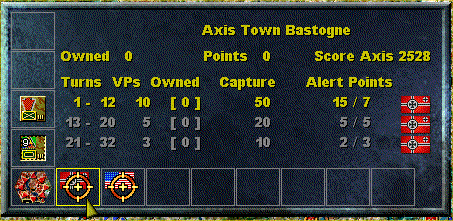
This display gives us a summary of the Town in Axis control. So far it has been owned for 0 turns by the Axis (grrr), contributing a total of 0 points to the current Axis score of 2528 points.
The turns colum now allows the scenario designer to allocate up to 3 separate periods in which rewards for the Axis player may be specified. As you can see, if the Axis player captures Bastogne he will get 10 vp's per turn between turns 1-12 and a once-off Capture bonus of 50 points. Note how the vp's and capture bonus drop if the Axis player captures the town at a later point in the game.
The Alert Points area displays that if captured during turns 1-12, the Axis player will get 15 step replacement points and 7 Alert Unit points. The Flag to the right indicates what side are awarded the Alert Points - in some cases, although the Axis player might get vp's and capture points for capturing an objective, the enemy force might get rewarded the Alert points. You can see this easily by looking at the tactical map - Alert Points are awarded to the side as indicated by the Flag next to the objective.
If I now click on the American flag I get a different display for the same hex:
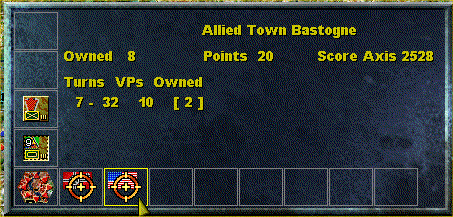
The Allies get nothing for the first few turns, but from turn 7 onwards, they are hurting the Axis player by contributing 10 points per turn to their VP total. The summary on the first line tells us that it's been owned by the Allies for 8 turns and has contributed 20 points in total so far to the Allied cause. Which hasn't helped a huge amount so far as the Axis are ahead by 2528....
So this part of it is pretty straight forward - you can see how a clever scenario designer can make an objective crucial at certain times of the scenario and worthless at others, making it a more dynamic victory system by varying rewards. But how does the Alert points system fit into the game?
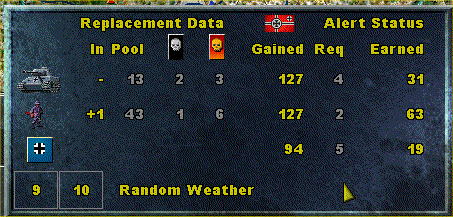
This took me a while to get my head around until I read the manual (rtfm..!) and discovered that if I right-clicked on the Replacement display under the tactical map, I would be shown a summary of replacements and Alert points status.
There are three main rows of information. The top row is ARM step replacements, the middle row INF step replacements, and the third row is Alert Units (as per the icons on the left hand side of the display).
In the Replacement Data colums, you will see the current game status for replacements.
The "In" coluumn tells us that for this turn, the scenario designer has given the Germans no ARM step replacements and one INF step replacement.
The "Pool" column tells us that at present the Germans have 13 ARM step replacements and 43 INF step replacements to use before the pool is depleted and no steps can be replaced.
The black and red skulls tell us that the German has currently two ARM normal steps to replace, and 3 timed ARM steps to replace onboard - and 1 and 6 respectively for the INF steps, so the Germans are looking pretty healthy at the moment!
If we now look across to the Alert Status area, the Gained column indicates how many Alert step replacement points the player has earned so far in the game and how many of these points are required to convert into a replacement step. So in the above example, it costs 4 Alert step replacement points for one actual ARM replacement step. You will find that this conversion rate will vary depending on side and scenario.
If you look at the Alert Units row, on the right it shows that I've earned 19 Alert Units from my objectives so far. These units arrive as reinforcements during the game (as you've probably already noticed, there are some units in the game that have arrived that did not historically participate in the battle - they are Alert Units and are specified by the scenario designer).
The bottom row shows the current and next turn (in this particular case as we're using random weather; in the case of Historical weather you can see up to 9 turns ahead). By mousing over the turn number it will display the number of step replacements that will arrive on that particular turn as programmed by the scenario designer, to be shown in the "In" column.
So you can see that not only can an objective hold variable victory point rewards but a mixture of step replacement and/or Alert units to spice up the game considerably. Some of the hardest decisions are those where you will get the victory points for an objective but the enemy will be awarded the Alert points...
Unkown Units setup option
A new setup option is Unknown Units, which both sides are using in this game:
At this point I'm going to quote Ian Trout of SSG who writes about this feature:
"The unknown variables are attack and defense strengths, and tank and AT shock values. The values remain hidden until a unit moves adjacent to an enemy unit or strongpoint. 'Undo' is canceled when unknown strengths are revealed."
"Unknown units vary from game to game, The primary reason for their introduction is to add a little unpredictability to unit strengths. On average, unknown units are 5-10% better that their known counterparts... we want to encourage players to use them."