I am in the process of having my turn as the Germans in the current AAR between Chris and myself. Rather then just posting the end of turn results as we have been of late. I thought I would give you all an insight into the planning of the attack. I will try and give you a look at the things which I consider when forming the attack.
Whilst I am by no means the best of players, and you probably will see things that I didnt see or consider, what this will do is give you an idea of the amount of information which is available to when deciding to commit your troops and Form the Attack!
The current situation is this, its Turn 14 of the 32 turn TAO game which is included with Korsun Pocket. I am the German commander and Chris is the Allied commander. To date, Chris is managed to slow my advance and form a solid line. But turn by turn I have been punching away at it - slowly.
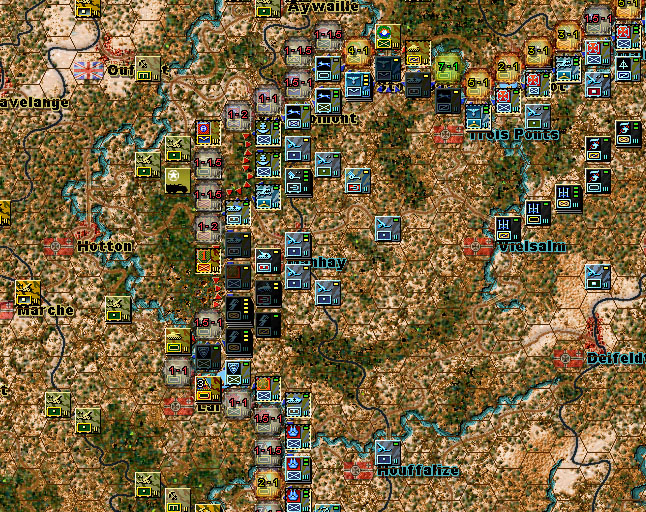
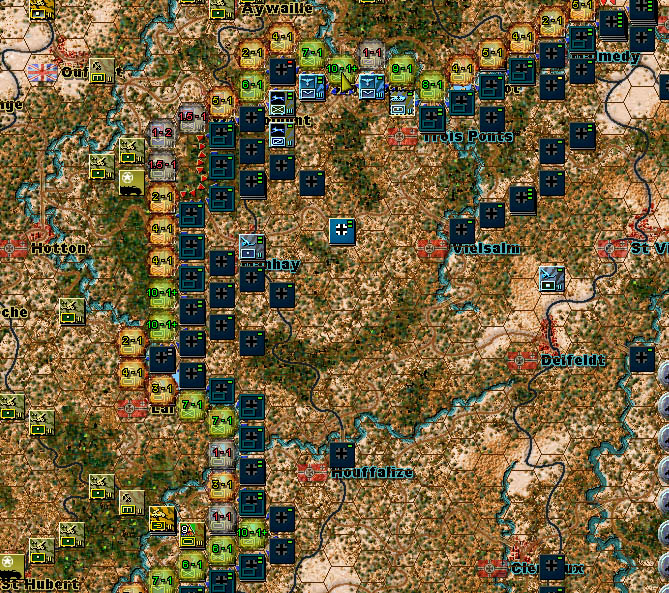
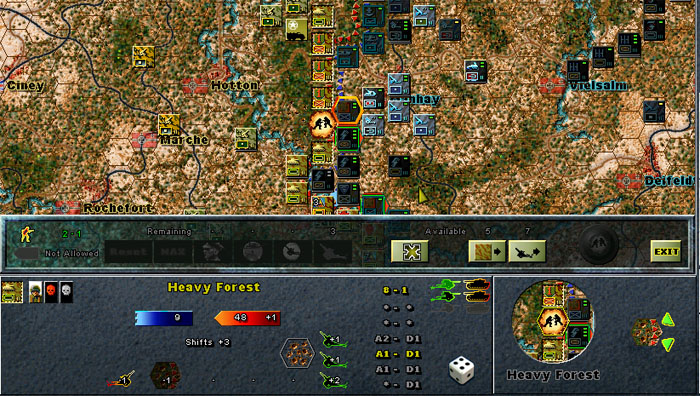
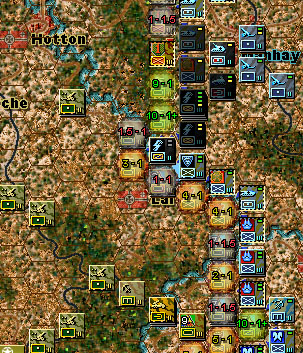
The area we will focus on here is borded by Malmedy, Stoumont, Werbromont, Hotten, Laroche and just north of Bastogne. As shown below.
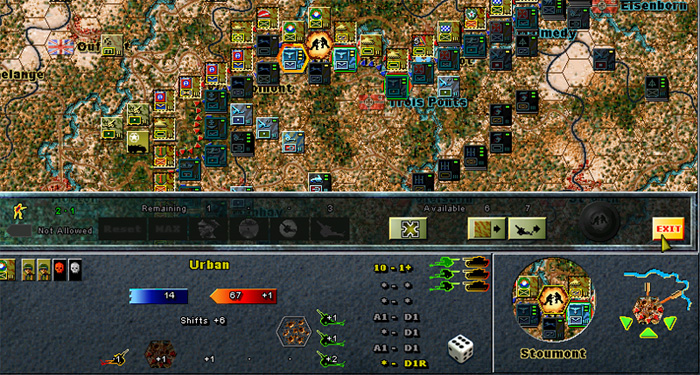
As you can see from the above shot I have turned the combat adviser on. This shows me what odds I am able to get against each of the allied units that I am able to attack. Infact I am able to mount an attack against any allied unit within the front line. Some of the odds are better then others obviously. The ones in red and not recommended for attack, the orange ones are each way bets and the ones in green suggest that its going to be worth my while to throw in an assault there. It doesnt end there though in terms of using the combat adviser, and we will come back to it in a minute.
In the mean time I have some more pressing issues. Just south east of Aywaille you will notice that I an element of the 116th Pnz. He is leading my speadhead north west. If you dont know what units I am referring to, then look for the stack of units that have a red dot on them. They look like this:
![]()
There are two units in this stack, I know this because of the two dots represented on the unit icon, one dot is Red and the other is Grey. One dot for each unit. The colour of these dots tells us some very valuable information. Take a look around the map and you will see that most stacks have green dots. Green dots mean that the unit is in supply and can attack this turn.
In a previous Article, I talked about Supply and Bullets and what happens when a unit goes into the "Red". For more information relating to how 'bullets' and supply works, please see those articles. But for the benefit of this article, here is a quick reminder of what each of those coloured dots mean:
Green - in supply and have not used their Attacking Action Capability (AAC)
Yellow - in supply but have used their AAC (ie they have already attacked this turn etc)
Grey - not in supply, have not used their AAC and have bullets left to draw supplies from
Orange - not in supply, have used their AAC but still have a bullet to draw supplies from
Red - not in supply, have used their AAC and have no bullets left (no ammo!)
So we can see that those two units are not in supply at all. One of them has some bullets left (reserve supplies), but one of them is out of reserves and has no ammo! This is a bad situation and I need to fix this! But lets see what unit it is first.
Right clicking on the stack tells me what units are located in that hex, I can now see that its an elment of the 3FJ that is 'in the red' and not the 116th as I had originally thought. The reason that this has happened is pretty obvious..
But lets focus on it for a tick. At the start of each turn, all units that are in a supplied hex will replenish their supplies. This means they get all of their bullets back. If a unit starts the turn in a hex that is not supplied - then it is not able to replenish its stock and must rely upon its reserves of supplies that it carries with it.
The best way to see which units are in supply is to click on the Supply Button that can be found on the control panel in the bottow left hand corner of the game.

Alternatively, right clicking on a unit will disply information relating to the hex that the unit is located in, this will also indicate whether that hex is currently supplied.
Dont fall into the trap of checking which hexes are suppled (like I sometimes do!) by selecting a supply truck. Doing this will advise you - as a guide - which hexes will be supplied NEXT turn - not for the current turn. Moving a supply truck mid turn will not effect the supply status of hexes until the next turn. This is because supply is issued at the very beginning of each turn. Also note that enemy units, ZOC and interdiction can all effect a supply sources ability to distrubute supplies to units/hexes.
This is why we say that that the overlay radius around supply trucks is only an indication of what hexes it will be able to supply next turn. If the enemy places an interdiction marker or moves a unit which cuts that supply during their turn - then this may have a significant impact on your supply in your following turn.
Ok now that we have that information - Im not going to do anything about fixing my supply problems just yet - its time to have a more detailed look at where and what I can attack with.
Returning to the first image:
So the areas that I may consider 'hitting' are the 10-1+ that is flanked my by 3rd FJ units, the 7-1 which is adjacent to the NW - next to where I have those supply problems. Moving south west there is the 6-1 which my 116th Pnz are lined up against. And then thats about it until I get down to the two 10-1+ attack odds around Laroche.
So what's it going to be? Thats the million dollar question. Of course I could just not attack at all. But thats not really an option is it. Chris' allied forces are not that solid all along this line. Whilst some of his individual units are strong, with 3 and 4 steps, the problem he has is that he doesnt have the critical mass in terms of unit numbers. Although we need to be mindful of the 2rd ARM which you should be able to see at the top of the map. This may guide my decision making.. but lets examine my options more closely.
Option 1, is the first 10-1+ attack odds I mentioned above. Lets have a look at whats sitting in that hex.
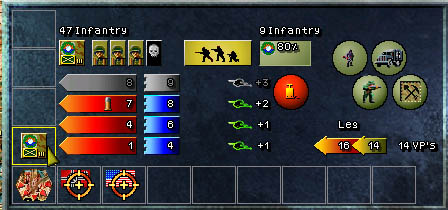
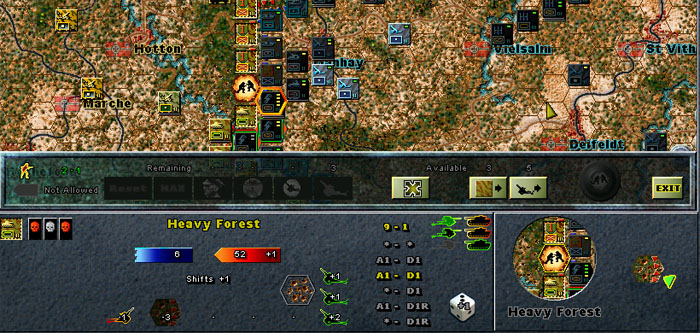
The allied unit there is an element of 9th INF, has 3 steps and a defence value of 8. But thats not enough, I need to know more, what sort of terrain is he sitting it - terrain plays a significant impact on attack and defence results.
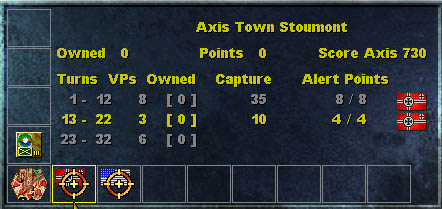
Arhh.. sneaky little blighter is sitting on an objective! He is holding Stoumont! This pop up tells me that the objective is worth 3 VPs a turn for each turn that I hold it, I get 10 VPs for capturing it and I get 4 alert points each towards additional replacements and units. At this point in the game thats quite worthwhile. It would have been better if I was able to nap the objection prior to turn 13.. but thats another story.
Stoumont is a town, so the CRT (Combat Results Table) for Urban is going to come into play. So lets have a look at what the CRT looks like for Urban.
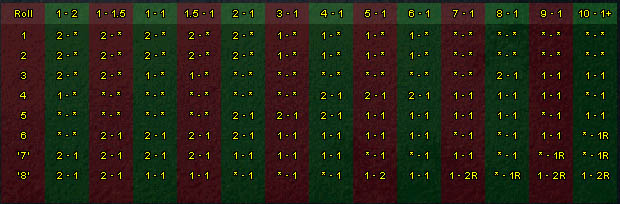
Ok, the way this works is like this. Listed across the top are the combat odds, and then running down in columns are the possible results depending upon what the fortunes of war throw your way. You will notice that whilst the results are always a 1-6, the CRT lists odds for 1-8. This takes account of the possible 2 additional shifts you can sometimes get in combat. More on this in a future article.
So looking at the 10-1+ odds, I can see that I am going to have to be lucky to get the allied unit to retreat. Let's have a look at the other end of the scales and take a peek at the CRT's for clear terrain.
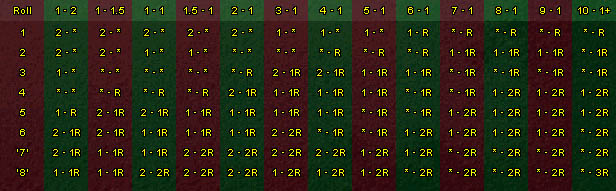
Woo hoo! Look at that.. it doesnt really take much to inflict some damage on someone sitting out in the clear. You may have heard both Chris and I mention how dangerous it is.. there will come some turns in the game where you will have to make some serious decisions as to whether you want to defend in the clear, or if you want to create a gap in your line. They are not decisions to be taken lightly.
But back to this assault on Stoumont. The neat thing about the combat adviser is that not only will it tell you what odds you can attack someone with, but it will also tell you what units to use to achieve those odds. To activate this feature, all you do is click on the unit you want to attack, and it will highlight the units of yours you should use in the assault. So here goes, Im going to click on the allied unit in Stoumont with the 10-1+ odds.
The combat adviser has now highlighted the units which I should use in the assault to get the required odds. Right, so lets do it! Now knowing what units I need to throw into the assault, all I need to do is move them and cross my fingers!
Woo hoo! Have a look at this (image quality reduced due to resize and compression):
The fortunes of war were on my side! There is no doubt about that.. I was lucky.. there was nothing Chris could have done. Put it down to local German commanders doing everything according to plan, good German intelligence leading up to the assault meaning we knew exactly what buildings the allies were hiding it, or was it a case that one of the Allied commanders went left when he should have went right. It doesnt matter, thats the fortunes of war. :)
As part of that assault, I pulled that 3 FJ unit that was 'in the red' back, to a supplied hex, so that he could resupply and take part in that assault. I have exploited the attack and advanced a German infantry unit into the town to secure it.
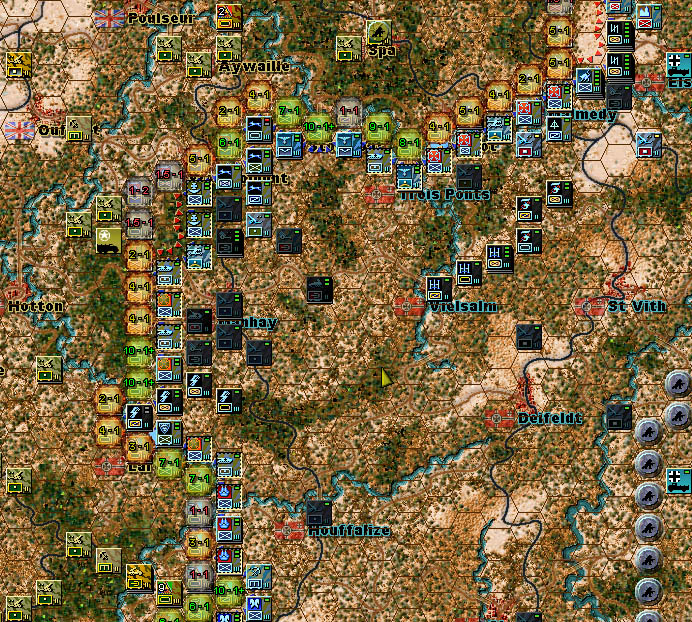
The state of play now looks like this. You will note that the combat odds have now changed to reflect that some units have already attacked and therefore cant take part in any more assaults this turn. Thus some of the odds available to me have now decreased.
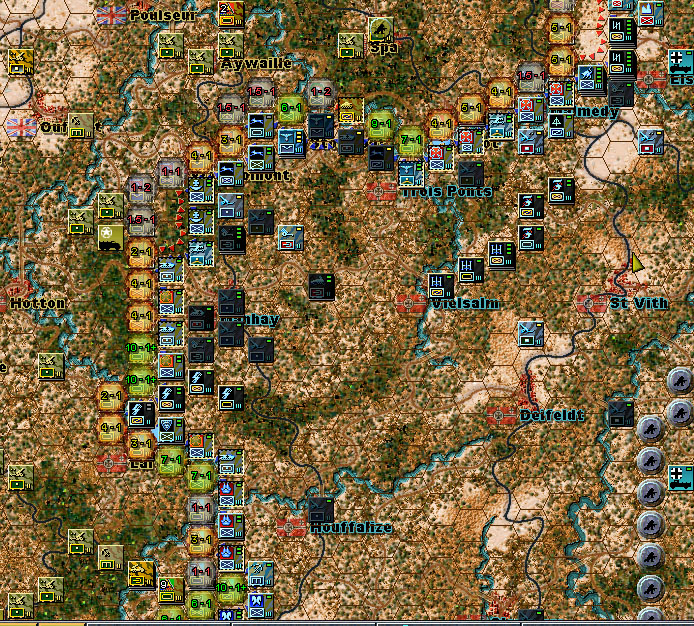
Ok, looking East of Stoumont, I have a 9-1 and 7-1 odds against two allied units. The 7-1 is attacking across a river, its an Allied ARM unit at full strength and dug into Forest. Im not going to touch him. Its too hard attacking across rivers, I will wait for the snow. Its mud at the moment.
The 9-1, which is also an ARM unit, is not dug in, but its sitting in Heavy Forest. Whilst he is on my side of the river, Im not worried about him right now.
Running west from there, there is a 6-1 against a full strengthed Allied INF unit, not dug in and sitting in forest. I could pick on him I spose, but being full strength, Im not going to do him alot of damage in the short to medium term. I would prefer to go hunting for some units that are already weak.
I am aware that Chris has the 2nd ARM moving down, Im not going to let him put them into an offensive action, I would prefer he had to use them to plug a few holes in his line.
Following the line down south, I come to these two 10-1+ odds.
This looks quite enticing. Further down south, Allied Chris is probing with his strong ARM between Houffalize and Bastogne.. I think I can cover him, but whilst he is doing this he is stretching his line to the north and the south of the probe. These two 10-1+ opportunities represent the northern edge of his advance. If I can push through here then I may have an opportunity to pocket the allied 7th and 9th ARM which is he is using to drive further south.
So to my mind, Im not going to pass up these 10-1+ opportunities. I have been working towards this for the last few turns. Lets see what I can do with it.
The northern most opportunity is an Allied ARM unit - lets have a look at it:
As you can see, he has lost one step, and therefore is limping. That makes for a good target in my book!
Looking at the terrain that he is sitting in:
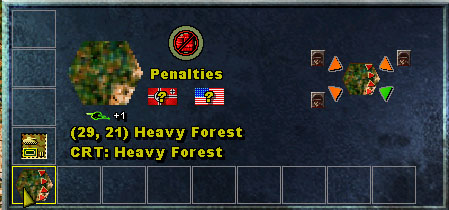
We can see that its Heavy Forest. Which is going to significantly aid the defender. Its almost as good as Urban terrain in terms of defence. Can you also see to the right of this panel, there are 4 arrows heads (or triangles), 3 of which are orange and 1 of which is green. This shows me from what direction I need to attack to get the most combat tactical shifts (represented by green). As you can see, I can only manage to get one combat shift.
Whilst I may have units attacking from multiple directions, I wont get a tactical combat shift from all of them. Units taking part in a combat can not get a tactical shift if they have an enemy defending on one of the flanks from where they are attacking - unless the attacking side has overwhelming numbers.
Lets have a look at the other 10-1+ opportunity to this ones south. It too is an allied ARM unit.
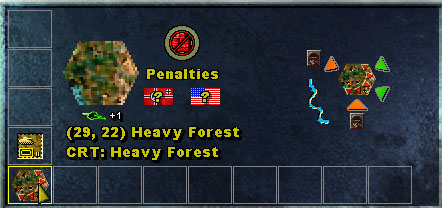
This one is also in Heavy woods, but I am able to get 2 tactical combat shifts. The other difference is that this unit is fully strengthed and not wounded. I think the first one looks like a better target.
So lets do it! Im not going to attack at 10-1+ though - and this is why..
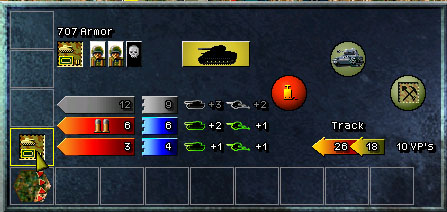
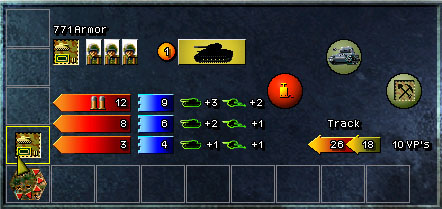
My first assault I limited to 8-1 odds and here are the results:
At 8-1 odds, I have a 4 in 6 chance of causing a 1 step loss. It also means that I havent committed all of my troops and if I am successful in inflicting a loss then I may be able to attack it again with the rest of my troops. The unit should be weaker and I probably wont need as many units to inflict more damage next assault.. and as you can see I was successful.
Now lets refresh those combat odds and see if I can hit him again!
As you can see, after some shuffling of units around, I can hit the same unit again at 9-1 odds and if successful will have destroyed it. Lets do it!
Got the result I wanted. As you can see its not always best to attack at the highest odds, sometimes its better to attack at lower odds to inflict some losses and make the unit weaker and then hitting it again. Remember, the weaker the unit the easier it is to get higher odds against it. So this makes sense.
Unfortunately, I was not able to exploit into the gap that I created - except for a recon unit.. which I decided against doing..
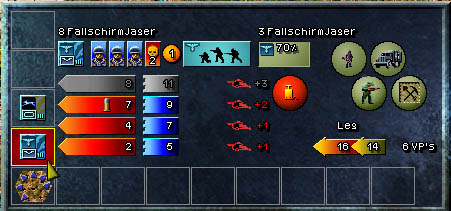
After all of those assaults, here is a final look at the what the Combat Adviser has to say..