
Everything you ever wanted to know about Artillery but were too scared to ask..
Artillery are represented as cannon, rocket and mortar units on the battlefield.
Artillery units are support units and do not have any direct attack capability although they do have a ranged attack capability in support of both defence and attack. Generally they should be keep safe behind lines within range of providing that bombardment support.
Let's examine one of the German Artillery units and have a look at it in more detail.
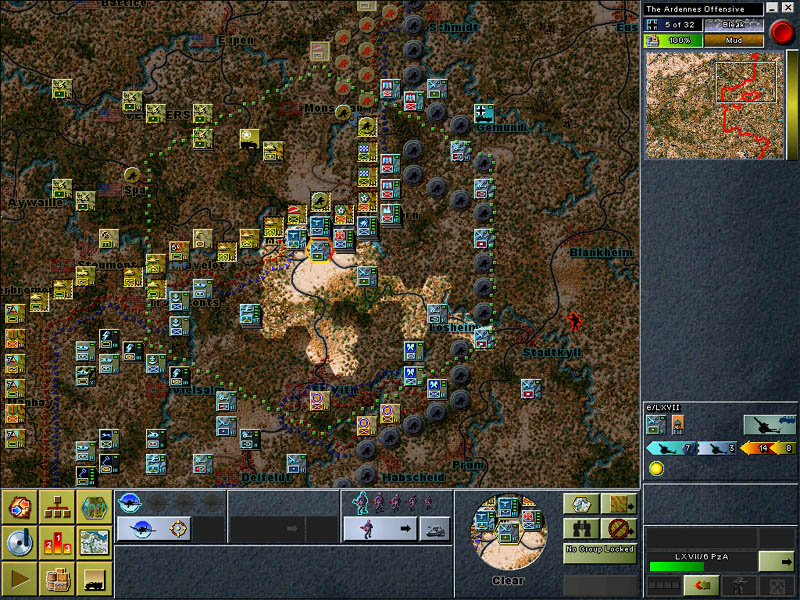
Selecting the unit at hex 45,14 just to the south east of Malmedy automatically brings up the units movement range and bombardment range.
The units movement range can be seen by the lightened hexes the hexes the unit can not move to this turn are darkened. A unit can extend its movement range by electing to forgo its attack capability in exchanged for increased movement ability. Think of this as the unit spending all of its turn time' moving rather then spending some of its time participating in an attack. Note that the extended movement ability is not unique to artillery units. Most units (but not all), can take advantage of extended movement.
The units artillery range (or bombardment range) is represented by the green hexagon centred around the unit. This shows that this unit can provide artillery support for any attack or defensive action within this range. So clearly, this unit is specifically providing support to the Malmedy Elsenborn area. I could and probably should, move it one hex south so that that range extends down to include the forthcoming battle between my units and the allied 106th just south of St Vith.
Note that an artillery unit can not directly attack another unit. I can only contribute to combat by adding support, to one attack each turn. So I couldn't use this unit to support an attack around Elsenborn and then use it again to join the attack against the 106th around St Vith. Also, a unit can't attack' and use its extended movement in the same turn.
The unit display information is shown in the right hand panel next to the main map.
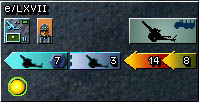
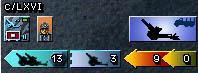
This information shows the units name as e/LXVII. It is an Artillery unit which is currently in supply as reflected by the green dot on the unit icon. Further more this unit has 1 step, represented by the single icon of the German soldiers head and its mode of transport is motorised (shown by the truck).
The next line down shows the units vital statistics'. Reading left to right, the units artillery range (7), the units defensive capability (3) and the units extended movement (14) and normal movement (8).
I know that the 7' mentioned about represented a range rather then a direct attack strength (which you would find for an attack capable unit like ARM or INF), because the 7' is shown inside a hexagon to represent the number of hexes'.
![]()
The yellow circle under the unit information tells me that the unit is currently selected. This button is handy when you have more then one unit in a stack and you don't want to select them all.
So what does this information tell us? Straight up we can see how vulnerable this unit is. It only has one step which means it only needs to take one loss for the unit to be destroyed and removed from the battle. It also only has a defensive value of 3 this is the amount of fight it can put with if its attacked, 3 - which isn't very strong. So we probably shouldn't have it in the direct line of fire. We also know that the unit has a range of 7 so there really is no need for it to be in the front line under direct threat! So keep your artillery back behind the lines please.
But there are always exceptions to the rule. Let's have a look at the Allied mortar units which are just over the river from where my artillery unit is. Right clicking on these units I can see that Chris has 2 mortar artillery units stationed here - just SE of his supply truck.
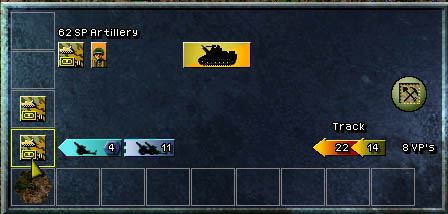
I think these two units are Priests'. I can see that they have an attack range of 4' (we know it's a range and not an attack capable value of 4 because the number shown is in a hexagon). This means the unit has to be within 4 hexes of combat to be able to participate in that combat either as offensive or defensive combat. You will also see in the above image, that this allied artillery unit has 1 cannon icon next to its range value of 4, and 2 canon icons next to its defence value. This is an indication of how strong the artillery is when supporting attacking and defensive combat respectively. But more on this a bit later.
Look at the defence value though it's 11 that's pretty good. Even though the unit in question, 62 SP Artillery only has 1 step.. it does have a strong defensive value and it probably should be sitting in a good defensive position, maybe in some urban environment like Elsenborn itself. What do you think? Is there a risk?
The rules of combat say that when a defender takes a loss then the loss will be applied to the unit with the most number of steps. So in this example, if this artillery unit was stacked with other units (say with INF in Elsenborn) and the allies took loses. The loses would come off the INF units in Elsenborn and not to the artillery unit. So there is only a small risk that the artillery would be destroyed, in fact it would only happen if/when the other stacked units had equal or less steps then the artillery unit itself.
Given the significant defensive value of these units it is worth having them up in the line in solid defensive terrain. Great! I've just given Chris a heads up haven't I! Who bets next turn he moves those units into Malmedy and Elsenborn?
So how does artillery contribute to combat? This happens when combat occurs within range of the artillery. As mentioned above, artillery is limited to only one offensive attack or use of its extended movement each turn. Note that some artillery can only move by trading their attack capability for extended movement. This makes for some very interesting decisions at times. Do you risk using your artillery in attack this turn and not moving, which may leave your main attack force without supporting artillery next turn?
When we examined the allied priest units, we saw that their attack range of 4 was accompanied by a single artillery silhouette, and its defensive value of 11 was accompanied by two artillery silhouettes. When artillery is involved in supporting combat, its involvement directly adds shifts' in relation to attack or defence. So using the allied priests as an example, in attack, this unit would add one positive shift to the assault. In defence, though, the unit would add 2 negatives shifts in response to the enemies attack. Remember that shifts have a direct effect and impact on the outcome of combat so they are significant adjustments.
Let's look at an actual assault to see how significant artillery can be on the combat results. In this example I'm going to simulate an assault on Elsenborn.

In the graphic above, I have committed all of the units within immediate attacking position of Elsenborn. I have also thrown a leadership and air support shift into the equation. At best I can achieve 1.5-1 odds. Which as you can see overall isn't going to get my any results at all. Now lets see what impact some artillery does to the results.
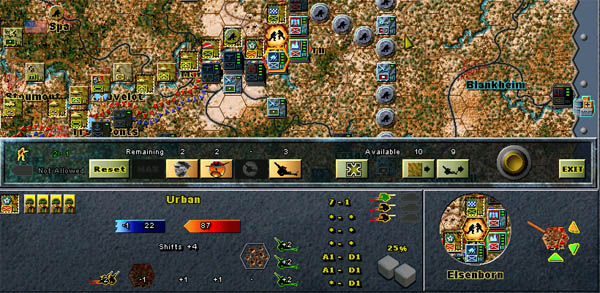
I have now thrown 3 artillery units into the attack. Note that 3 is the maximum amount of artillery which can take part in this attack. But the 3 artillery units which I have selected to take part in the attack each have a 2' shift artillery attack bonus.
This has resulted in a 3 x 2 shifts equalling a movement of 6 shifts. This is quite significant and is reflected in my attack odds of 7-1 when taking the artillery into account. Whilst 7-1 odds are not the best in relation to attacks on urban terrain.. you can see the difference between the attack with and without supporting artillery. It really does make a difference, and that's why you must not only find a balance between using your artillery in attack and using extended movement to keep it in support of your attacking units. But also, making the choices of where you want to attack with support of artillery because there is never enough to go around!
Unlike in attack, where you must allocate artillery and it can only be used once in support of each attack, in defence it is a slightly different story.
When you are on the receiving end of an attack and defending, in support of that defence your artillery units will be allocated automatically by the computer. As a general rule of thumb, only one artillery unit will be added in defence for each attack. The AI will determine the best artillery unit for the job, and the same unit can be used multiple times in defence.
So that's about it in terms of artillery. I hope that gives you an insight into how valuable and vulnerable your artillery can be. If you have any questions by all means please post them and we will do our best to answer after all we have an expert reading this review one of the game designer's himself Roger Keating. Roger feel free to clarify anything which I may not have been 100% on or which you feel I haven't explained clearly.