SSG
SSG
 Articles
 Files
Files
 Community
 Games Available Now
- Kharkov
- Carriers At War
- Battlefront
- Battles In Italy
- Battles In Normandy
- Across The Dnepr
- Korsun Pocket
Carriers At War Stat
Allied Ordnance Hit (lbs)
837,325,890
More General Stats
User Stats
Kharkov: Disaster on the Donets May 12 - 28 1942 is a regimental level simulation of WWII combat. The battle started with a major Russian offensive, but ended with another pocket and another disaster, reminiscent of the deadly outcomes of the 1941 battles.
The game design incorporates elements from our previous successful Decisive Battles and Battlefront games, along with some new design features intended to further increase the realism, unpredictability and excitement of the game.
Here at SSG we are realistic enough to know that not everybody reads all of the manual. But if you’re only going to read part, please read this. It introduces the game, showcases all of our new design elements, so players of our previous games will be able to jump right in after reading this and it also incorporates designer notes, so everybody can understand the thinking behind our decisions.
What is Kharkov?
Kharkov is a blend of our Decisive Battles and Battlefront systems, together with some important new features. The Kharkov system can be used to make battles at either regimental or battalion scale and is therefore a successor to both Battlefront and the Decisive Battles systems.
What does the game cover?
The game covers the doomed Soviet counter offensive at Kharkov between May 12th and May 28th, 1942. The Red Army’s offensive was intended by Stalin to crush the fascist invaders, and start the process of their eviction from all Russian territory. The battle started well for the Red Army and some substantial territorial gains were made. However, the inconvenient and unknown presence of two fresh Panzer divisions in Kharkov itself, combined with Stalin’s willful refusal to admit reality, led ultimately to a recreation of the dismal encirclements of the previous year, and opened the door for Army Group South’s drive to Voronezh and ultimately on to Stalingrad.
The battle is definitely fun for both sides. The Soviets start the game with enormous combat power and can make life very difficulty for the Axis defenders, especially with Russian cavalry regiments free to roam through lightly defended areas behind the front and powerful Tank Brigades poised to exploit breakthroughs. Unfortunately for the Russians, the Germans were planning an offensive of their own on the Russian southern flank, and this kicks off on the fifth day of the battle. Provided the Axis defenders have managed to prevent disaster during the initial Russian push, they then get to mount a powerful attack of their own, and it is the Russian’s turn to scramble in defence.
What are the main design innovations?
A fundamental problem in wargame design is the iron grip of hindsight. The player knows, or can easily find out, what happened in the course of the historical battle that we are trying to recreate. Hindsight allows him to perform many actions that his historical counterpart could never do. Quiet sectors of the front can be completely stripped of men, leaving large sectors guarded only by historical knowledge. Orders from Hitler or Stalin, historically disregarded at extreme peril, can be safely ignored.
There are two solutions to the problem. One involves erasing your memories of the battle and frankly we don’t have the technology and in any case we’re not confident of speedy regulatory approval even if we did.
Our second solution lies with the twin innovations of Areas of Operations and Mystery Variants. With Areas of Operations (AOs) all units in each formation in the game are prevented from moving outside the AO designated by the scenario designer. While our previous games tied a formation’s Attack Supply to its HQ, and imposed penalties for HQ movement, a determined player could still uproot a formation from its proper place in the front line and send it halfway across the map to fight elsewhere. With the AO system, this simply can’t happen.
How Does the AO System Work?
To illustrate, let’s consider the Russian 21st and 23rd Tank Corps, which are part of the Russian 6th Army and which start the game in reserve behind the front lines south of Kharkov. Their task was to exploit holes in the Axis defences created by the 6th Army’s infantry formations and form the southern pincer of the drive on Kharkov. With no AO restrictions, you can undertake a number of ahistorical and unmilitary operations with them.
Firstly, you could throw them immediately into the breakthrough battle, even though the Russian orders were to wait for the infantry to create the breakthrough. Secondly, and even more drastically, you could dash off a short (and surely suicidal) note to Stalin informing him that his cherished summer offensive was cancelled because you ‘knew’ that the Axis would be up to something bad on the southern front five days from now and you were moving all his precious Tank Corps south to meet the looming threat (that only you knew about).
The AO restrictions prevent both of these undesirable eventualities, but naturally these AO restrictions work both ways. Just as the Russian player can’t strip his front lines to pile units in the way of the Axis, the Axis are prevented from doing the same to block the Russian thrusts on Kharkov. Instead, both players must solve the problems they face with the forces that they have to hand as best they can, just like their historical counterparts, while still retaining militarily sensible defences in other sectors of the front.
Naturally, the AOs change with circumstances and time. In our example, the Tank Brigades will have a much expanded AO the turn after the infantry formations capture two designated objectives, or on Turn 5 regardless of the infantry’s progress. So if your infantry does well you are rewarded by the early release of the Tank Corps but if they are blocked then the tanks will eventually show up to try and force the issue.
In general, AO restrictions are eased over time. Also, reserve formations, especially those off map at the start of the battle, or alert formations released if the enemy captures important objectives, will have wide AOs so that they can perform their historical role as fire brigades, plugging gaps or countering breakthroughs.
What Do the Mystery Variants Do?
Gamers, being gamers, will naturally try to exploit the system. What is to stop them from learning the other side’s AOs and exploiting that knowledge? This is where the Mystery Variants come in. Each side has ten Mystery Variants. In each variant, each formation could have a different set of AOs, or different timing on existing AOs. In general, these variations will enlarge AOs over those found in the Historical Scenario, so you will never be sure of where enemy forces have been ordered to go and you will be unable to base your actions on the AOs found in the Historical Scenario.
Some variants are combinations of changes found in other variants so even if you work out that one enemy formation has new orders, you won’t be sure that other formations haven’t been given similar freedom.
The result of the Mystery Variants is to more or less eliminate the benefit of hindsight (without messy surgery or experimental drugs). You will have to react to events as they unfold and make sensible decisions for all your forces. For instance, the northern sector of the battlefield is normally quiet for both sides. However, one or more variants will allow a subsidiary Russian drive on Belgorod. If all the German defenders have migrated as far south as possible to help out at Kharkov then the results could be very embarrassing for the Axis player.
So How Does the System Work?
You can choose to play the Historical Scenario or the Mystery Variants at startup. Similarly, use of the AOs is optional, although highly recommended. Let’s take one of the Russian Tank Corps mentioned above as our example.
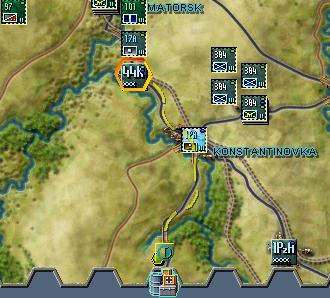
On the first turn, the 23rd Tank Corps has a very restricted AO, as shown by this screen shot. The area in which the formation is prohibited from moving is shown in red (and it’s almost all of the map).
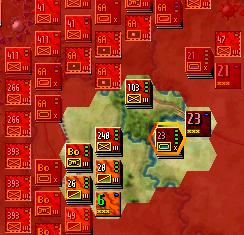
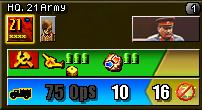
To find out more about the AOs we go to the HQ for the formation. This HQ is the 23rd Tank Corps and it is shown below.
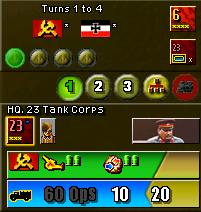
The row of buttons in the top panel shows that the current AO applies from Turn1 to Turn 4. If we click on the second small green button (immediately to the right of the small highlighted green button), we get a different picture.
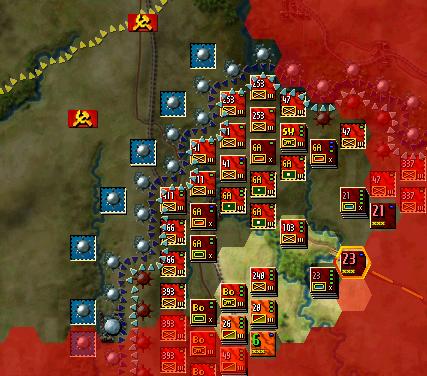
On the map, we can see that the new AO is much larger, and it actually extends outside of this screen shot. The two Russian flags on the map, behind the German lines, indicate the objectives that must be held in order to enable this larger AO.
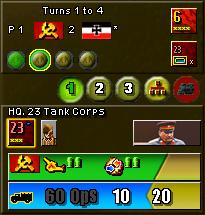
Looking at the HQ picture above, we can see that there is the numeral ‘2’ next to the Russian flag. This means that the AO can be achieved by taking 2 objectives, indicated on the map by the Russian flags. So the deal for 23rd Tank Brigade is as follows. For Turns 1 to 4, its AO is very restricted, and is greatly expanded on Turn 5. However, if the two objectives indicated by the Russian flag are taken, then the extended AO becomes available the turn after the objectives are taken which could enable the early release of the Tank Corps.
So What Does It All Mean?
For some time now, we have been adding design elements that simultaneously enhance realism and excitement. The closer coupling of units to their HQs and the provision of attack supply through HQs has enforced a more realistic tempo of operations, as units can no longer attack every day. Now, the combination of AOs and Mystery Variants restricts the location of operations as well as the tempo, while at same time increasing uncertainty and tension by removing the dead hand of hindsight.
The new system has many benefits. The AOs act as a battle plan, leaving the implementation up to you. At the start of a scenario, you will know exactly what you have to do, and which forces have been allocated to achieve your objectives. You won’t know what your opponent’s orders are, or where his forces are allocated, which prevents scripted openings and greatly enhances the excitement of the game in both single player and PBEM games. You are now much closer to stepping into the shoes of your historical counterpart than you have ever been before.
Further Design Changes
We have made a number of other changes from the Battlefront/DB design, and these are listed below.
Discontiguous Combat Tables
Military operations, like so much in life, are subject to diminishing returns. We have changed the CRT system so that, especially at higher odds, not every odds level needs to be listed in the CRT. For instance, the next odds column after 5:1 might be 8:1 and the one after that 12:1. Naturally, if you don’t have the numbers to reach the next odds column, then the odds will be rounded down. This allows us to make a meaningful distinction between each odds column and is a reminder that sometimes adding a few more troops to an assault will make no difference whatsoever to the outcome, and you just have to take the result as is.
We have done this because it reflects the reality of military operations. The best planned and led attacks could still miscarry and the occasional reverse is not only to be expected but could not have been avoided by the simple addition of a few more troops, as was often the case under our previous system.
Please remember that your opponent is likewise suffering, and that, over time, every setback on your side will be matched by life saving blunder from your enemy. Also, for the record, the computer has no idea of what constitutes a ‘critical’ combat and adjusts no combat rolls in its favor at any time.
Direct Attack
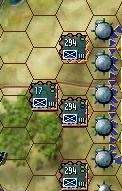
We have removed the mechanism for ranged Direct Fire in attack and replaced it with a simpler system. Now units are rated for Direct Attack shown by a yellow dice on the unit information panel.
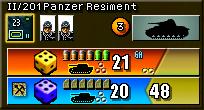
The II/201 Panzer Regiment shown above has a yellow dice showing a ‘4’ on its attack bar. This is its Direct Attack factor. For any melee combat, against an eligible defender, all friendly stacks that are adjacent to the defender and could gain a tactical shift, will contribute their best Direct Attack factor to the combat. Each stack can only make one contribution per combat. This contribution is in the form of a dice roll in the combat. If the dice roll is equal to or better than the Direct Attack factor then the Direct Attack will cause an additional step loss, over and above any caused by the actual CRT result.
Strongpoints and entrenched units are not eligible defenders but any unentrenched units in a stack are.
This change reflects the extra lethality of armored attacks on men who are unprepared to receive them. Men can be unprepared because they have been driven from their prepared positions by a previous attack, because they are advancing into contested ground and have no opportunity to entrench or because they have chosen to reorganise and accept replacements instead of entrenching.
The change will also reward the careful player, who distributes his armored units to attack from as many directions as possible, (remembering that the chosen direction must gain a tactical shift), which will maximise the number of dice rolls made in the combat.
You can find the Direct Attack factor as the DF Attack entry in the Edit Combat Units section of the Editor.
Strongpoints Improved
A Direct Fire Defense value (DF Defense) can be assigned to any strongpoint, shown by a blue dice superimposed on the strongpoint icon. We have done this to reflect the simple fact that no matter how many men you have, the first ones to leave their trenches and assault a defended and fortified position are going to take some casualties.

Supply System Simplified
We have removed the Supply Trucks from the system. Now, HQs give General Supply to any unit belonging the HQ’s country within their OPs broadcast range, regardless of whether the units belong to the HQ or not.
Units get Attack Supply from their immediate HQ, or any HQ subordinate to their HQ that belongs to their country. In Kharkov, there are two countries on the Axis side; Germany and Romania, and HQs will only supply their own countries. The three Hungarian units in the game are classed as German because there is no Hungarian HQ.
To be in supply, HQs themselves must trace a supply line of any length to a Supply Source, typically on the map edge, shown by a dashed yellow line when the HQ is selected. Supply Sources can supply a single country or an entire side, at the choice of the scenario designer.
We have done this to simplify the system and make life easier for the player. It produces the same results as the previous system but makes supply much easier to understand. You now only have worry about a single factor, the position of a HQ relative to the units it commands.
So, in summary, the first thing that happens in a turn is that each HQ establishes whether it is in supply. If so, it functions normally; if not, it doesn’t function at all. A functioning HQ distributes both General Supply and Attack Supply.
Each HQ has a General Supply broadcast capability, measured in OPs. Since a unit can draw General Supply from any HQ of the same nationality, a supply net is applied to the battlefield. You can see this net by pressing the ‘s’ key. The supply net never changes during a turn. Any unit that starts the turn within the net gets General Supply, as does any unit able to move inside it.
Attack Supply is more restrictive. To get Attack Supply a unit must be in General Supply at the start of the turn. Units which draw General Supply by moving inside the General Supply net during the turn, do not get Attack Supply. Furthermore, units must start the turn within the command radius of their formation HQ, or a subordinate HQ, to be eligible for Attack Supply.
Movement System Simplified
We have removed the system of Reserve OPs and Extended Movement and replaced it with a simplified system. Units now get a basic movement allowance which is increased, often substantially, if the unit is command radius of their HQ at the start of the turn. Units outside of command range will find that their movement is quite restricted. Remember, if you are careless enough to lose your HQ in combat then there will be at least a one turn delay before it can be back on the map again, so avoid careless errors. HQs do have strong survival instincts though, and can only be spotted by an enemy unit that is adjacent to them, regardless of terrain or recon bonuses.
The previous system was used to restrain formations from cruising across the map in blatant contradiction to the laws of logistics. This function is now provided by the AOs which reflect logistical limits equally as much as command decisions. It takes a vast mountain of materiel to supply an army, even when it is stationary, and this logistical burden is greatly magnified if it has to move for any reason. Since the AOs now limit progress to a logistically feasible area, we have no need for other restrictions and can therefore simplify the system.
You will find this function in the Editor as OPs Resupply % in the Edit HQs screen.
Other HQ Changes
HQs can now hand out a large range of bonuses to their units. Two new additions to their functions include a modifier to Indirect Fire and a modifier to Direct Attack. These bonuses, up to +2 for both are quite significant. For example, the Russian 21st Army HQ near Kharkov has a +1 bonus to Indirect Fire and enhanced resupply for Attack Bullets. This happy state only lasts for the first few turns. Compare the ‘Before’ and ‘After’ shots here.
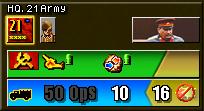
Note that HQs only change after they have performed all their supply and command functions, so the display is essentially showing how the HQ will perform next turn.
We have done this in order to reflect the necessity to prepare for large offensive operations, and the benefits that accrue when this is done. In this case it reflects the added power of Russian artillery at the start of a set piece battle, when the guns are ranged, the targets plotted and ammunition stockpiled and the similar affect on combat units when a large offensive has been planned and the requisite supplies have been accumulated and can be easily distributed.
This type of maximum effort was unsustainable, and the HQ evolves, (devolves really), to a more normal state which cause the tempo of combat operations to slow.
You will find these functions in the Editor as IF Bonus and DF Bonus in the Edit HQs screen.
Hedgehogs
We have added the ability to create a Hedgehog to the game. Hedgehogs can be thought of as a step beyond entrenchments, and a unit cannot hedgehog unless it already entrenched. As with entrenchments, not all units can create a hedgehog. A hedgehog has the same type of bonuses as entrenchment, with the important exception that no tactical bonuses can be gained against a hedgehogged unit.
Hedgehogs do exert less of a penalty to enemy movement in the surrounding hexes. This is to reflect the fact that a hedgehogged unit has organised itself for all round defence rather than linearly, and thus is less capable of restricting movement.
We have done this to reflect the ability of German units to construct very tough defences which were very difficult to directly assault. To deal with a hedgehog either deluge it with artillery or attack elsewhere and induce the defenders to leave their positions because they fear encirclement.
You can find the entry for this in the Entrenchment Rules section of Country Data in the Editor.